
Introduction
The Map feature provides a full-screen view that helps users manage and navigate their interventions more efficiently. By clicking the dedicated “Map” button on the main page, users can access this functionality.
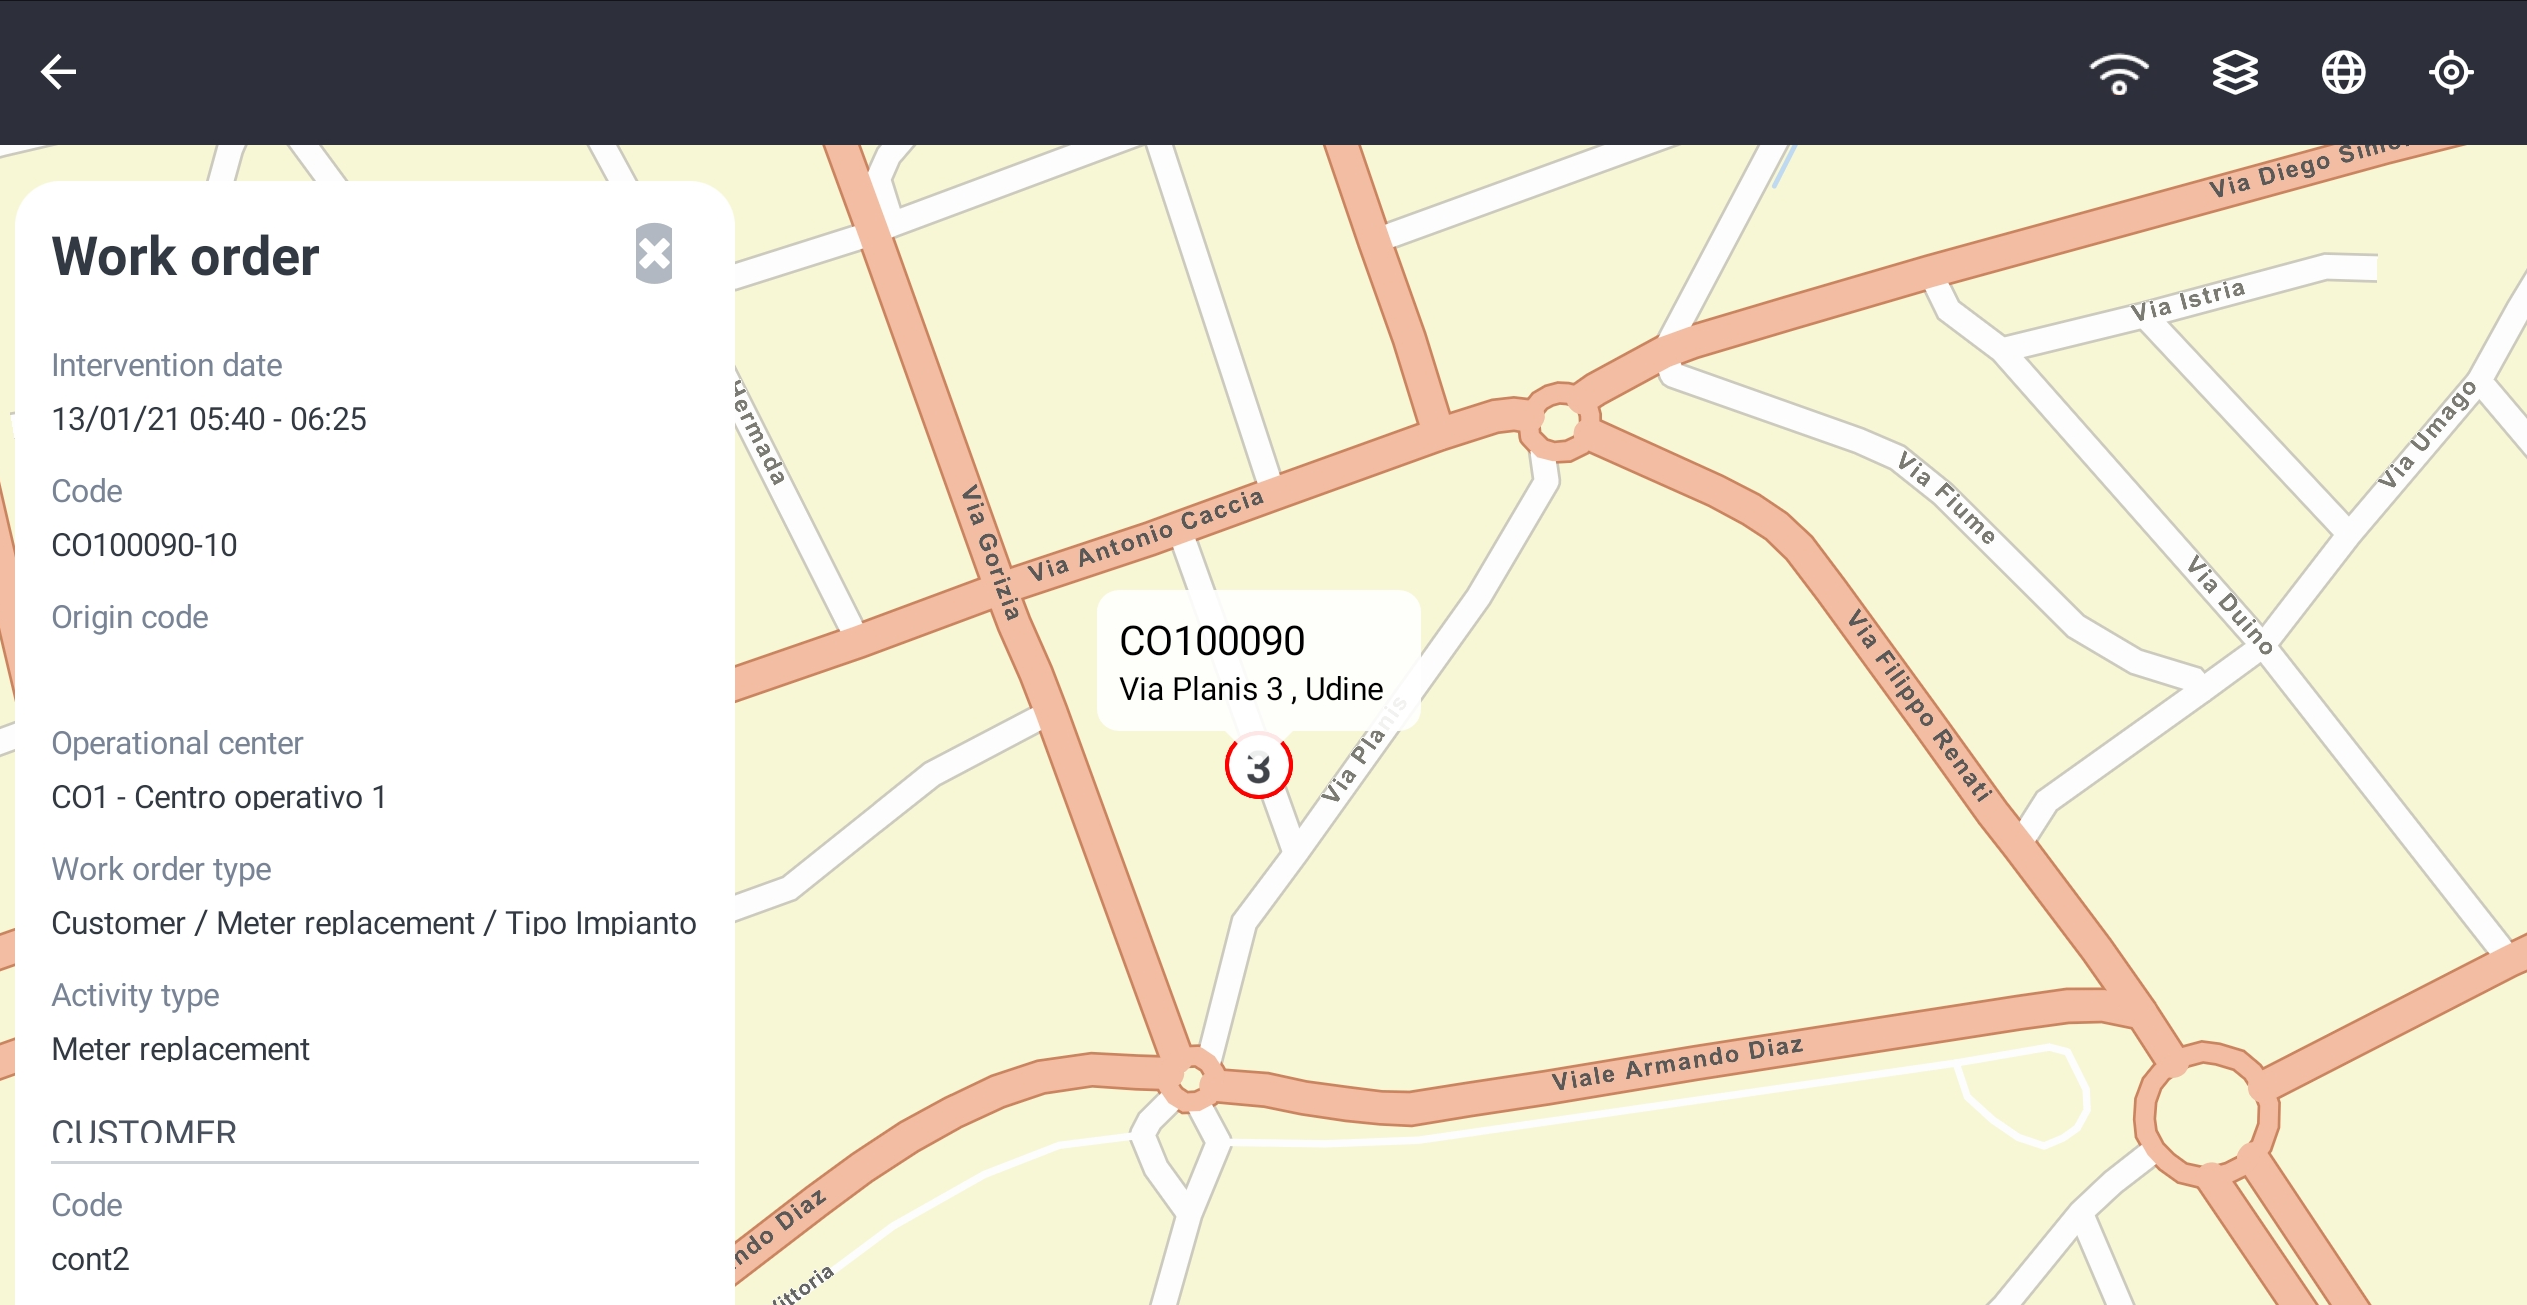
The map displays the locations of interventions scheduled in the agenda for the selected day. Each intervention is marked with a colored pin, where the color represents the intervention's status and the number corresponds to its position in the intervention list.
Users can click a pin to view detailed information about the corresponding work order (WO).
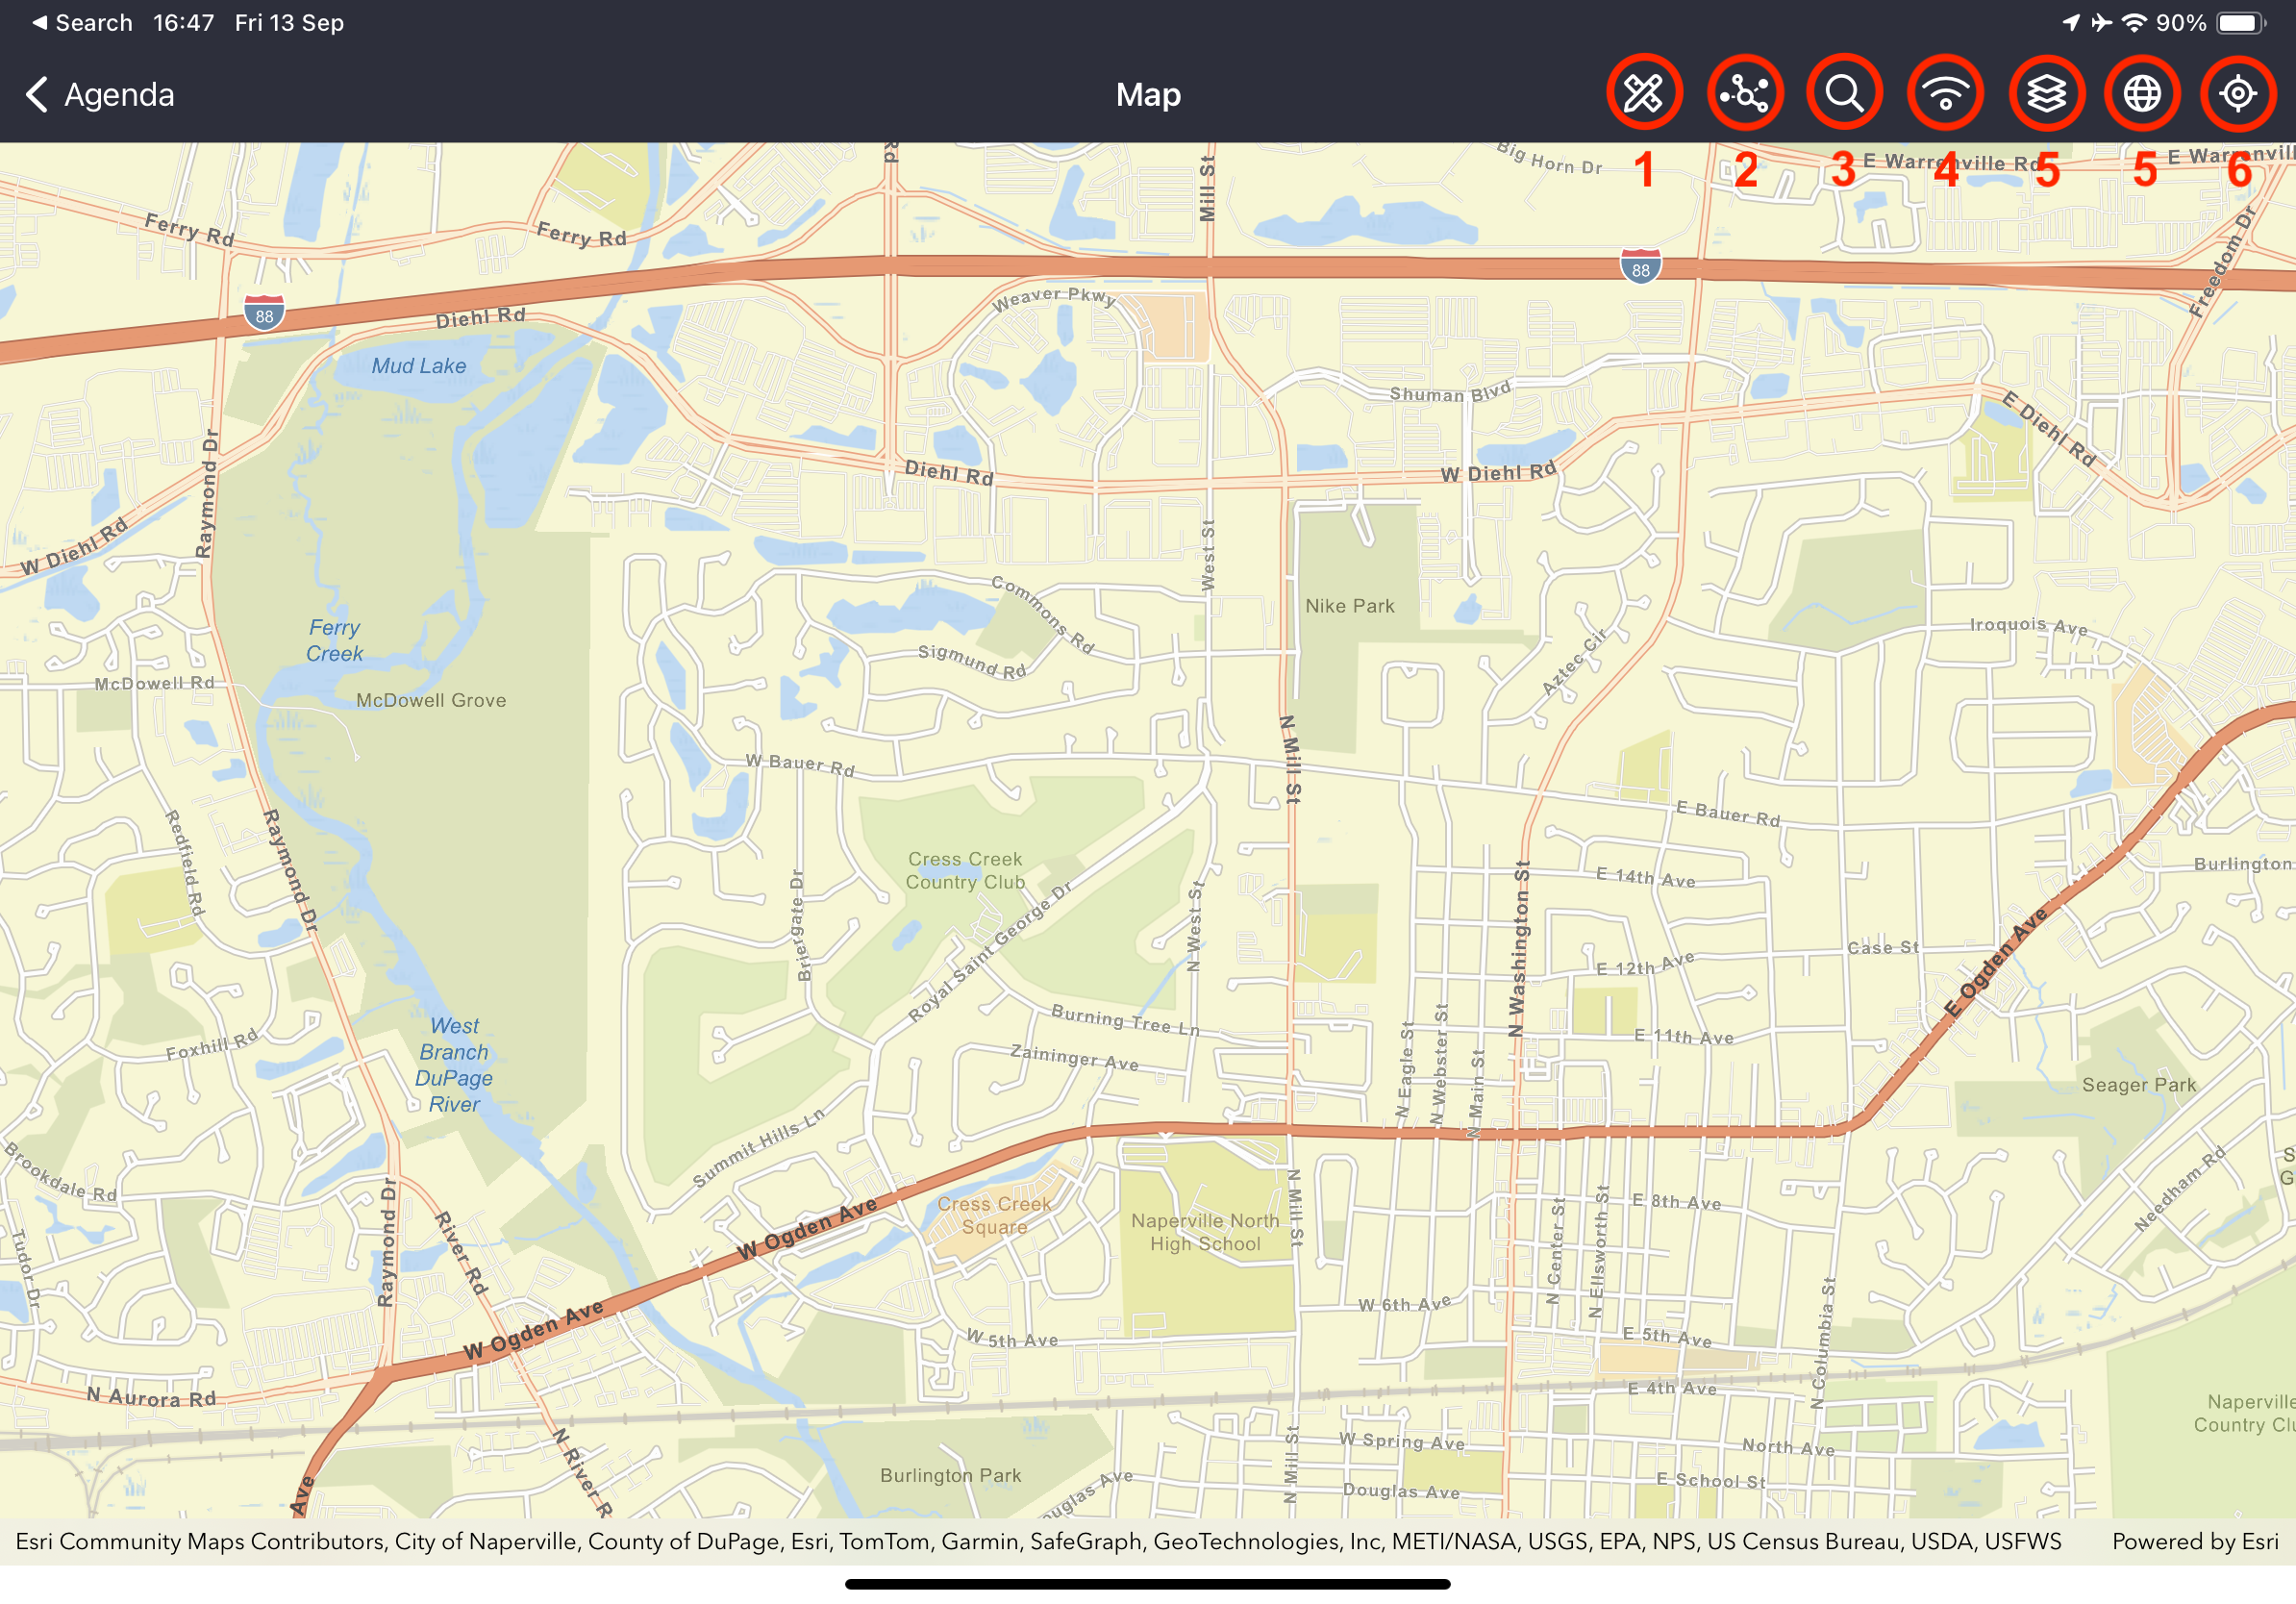
When accessing the map, the menu with the available actions on the right of the panel:
When accessing the map, a menu on the right side of the panel provides various tools and functionalities:
-
Redlining – Allows users to draw directly on the map using dedicated GIS layers.
-
Network Tracing – Enables users to highlight traces on an ESRI Utility Network.
-
Search – Lets users search the map for warehouses, technical objects, work orders, and addresses.
-
Offline Maps – Displays information about available offline GIS packages and their updates.
-
Layers – Allows users to enable or disable viewing of active mobile layers.
-
Cartography Type – Offers a selection of different map types.
-
Geolocation – Shows the user’s current position on the map.
The cartography with layers management (WMS, WFS, ESRI Feature Server, ESRI Map Server) is also available on mobile: the Cartography Client supported is ESRI for the most of all the features.
Layers
|
Please note that from version 18.0.0 ESRI user Authentication is needed in order to show the base-maps |
|---|
The Layers feature allowing to enable and disable the display of the set layers as active for mobile. They are divided into different groups depending on the configurations set by the server.
Furthermore, thanks to the slider available below the service name, it is possible to set the transparency of the layer on the map.
Depending on layers configurations, the active ones will be displayed on the mobile map:
Use the map to query the data referring to the layer displayed, by clicking the point to be queried: the data are uploaded and then the result is displayed, with the list of the elements detected.
Cartography type
|
Please note that from version 18.0.0 Customer’s ESRI Api Key or ESRI user Authentication is needed in order to show the base-maps |
|---|
It is possible to edit cartography type by selecting from the following map types:
-
Standard (road map)
-
Satellite
-
Hybrid.
Offline GIS Package
The Next-Gen FSM Platform Mobile app provides a pop-up dedicated for the consultation and management of Offline Packages.
For accessing the configuration of the offline packages to be downloaded on the tablet, click the “Offline Maps” button (button no. 1 in the “Map” figure) at the top-right to view all offline packages and the date of their last update.
By clicking the Offline Maps button, the pop-up appears, containing the following information:
-
in the header, there are two buttons
-
Back, to close the pop-up
-
Enable Sorting, it allows to order the offline packages in the list
-
-
two filters:
-
Search package, allowing to filter out the offline Offline Packages by name, filling in a specific text field
-
the second one is a combo box to visualize
-
All, both the Offline Packages to be downloaded and those already downloaded are visible
-
Downloaded, only the ones for which the most updated version has been downloaded
-
Need download, only the ones not updated or not yet downloaded
-
-
-
the list of Offline Packages, see the dedicated section below
-
Offline Mode, it activates the offline mode, allowing to view the downloaded maps in the chosen order.
List of Offline Packages
For each package are shown:
-
Name of the Package
-
Name of the related Online Service, if any
-
File Size
-
Download date, the update date of the last file downloaded on the device
-
Last update, the update date of the last file uploaded to Next-Gen FSM Platform Back-End.
On the right of the section, there are two icons:
-
the flag icon, in the Offline Mode, indicates:
-
if the flag is present, the corresponding packet will be visible respecting the chosen order
-
otherwise, if it is downloaded, it will not be visible
-
-
the download icon indicates:
-
blue icon, it can be downloaded
-
grey icon, it has been downloaded.
-
This information is updated throughout the Next-Gen FSM Platform Mobile synchronization process, thanks to the Replicator module of Next-Gen FSM Platform Back-End.
The Technician can launch the download of the files of all the packages visible to them, according to the visibility rules configured by the Administrator.
The downloaded file will replace any previously downloaded one linked to the same Offline Package.
During the download of the file, Next-Gen FSM Platform Mobile shows to the Technician an ongoing progress through the circular icon.
Each package file can be deleted by swiping left, clicking on the trash icon and confirming the choice.
Push Notification
Next-Gen FSM Platform Back-End, with a configurable frequency, verifies the presence of new files uploaded for offline GIS packages and sends push notifications to Next-Gen FSM Platform Mobile users interested in the update, defined through the visibility rules.
The push notification lists the updated packages and if chosen the Next-Gen FSM Platform Mobile app is launched.
If the Next-Gen FSM Platform Mobile app is active in the foreground or in the background, and the authentication token is still valid, then a dedicated pop-up appears asking the user whether to download the file or not.
Either way, the pop-up closes and the user can continue to use the app from where it was left.
If the app is closed or the authentication token is expired, the user must first login and subsequently the pop-up is displayed.
The user can also start the download in a second moment using the offline GIS package feature.
Map Search
In the Map header, a search button allows to search for Warehouses, Work Orders and Technical Objects directly from the map.
Warehouses search on Agenda Map
For further information about the Warehouses Search feature, refer to the Inventory Management paragraph (Mobile Warehouse Management (ENG))
WO Search on Agenda Map
By clicking on the Map search button and choosing Work Orders, the Work Order Search panel will appear, leaving the map in background. The resulting work orders will automatically be added to the Map, which will be zoomed in/out to show all results. The Clean button allows you to remove Work Orders resulting from previous searches.
For further information about the WO Search feature, refer to the paragraph Working with the mobile App → Mobile Search WO.
Clustering WO
On mobile, a new icon clustering feature enhances usability by grouping nearby Work Orders (WOs). When first accessing the map, WOs assigned to you will appear as clusters. Zooming in will break these clusters into individual items, displaying the number of WOs in each cluster. Searching on the map will also group items by type, and clicking a cluster will open a pop-up with all the contained elements, regardless of type.
Technical Object Search on Agenda Map
By clicking on the Map search button and choosing Technical Objects, the Technical Objects Search panel will appear, leaving the map in background. The resulting objects will automatically be added to the Map, which will be zoomed in/out to show all results. The Clean map button allows you to remove Technical Objects resulting from previous searches.
For further information about the Technical Object Search feature, refer to the paragraph Working with the mobile App → Mobile Facility Search
Network Tracing
In the map header, click on the highlighted icon to select the Utility Network you want to open. A drop down menu to select the network will appear. Please not that one utility network at time can be opened
Once selected all the elements will appear on the map. By default, Structure elements are hided. On the left panel, you can always select the elements you want to hide or unhide.
You can select an element by tapping on it. if multiple elements are present on the object, a pop-up with multiple selection will appear. In this way you can select the right one. The one selected will appear highlighted on the map
By selection the object, you’ll have access to all the details coming from ESRI. On the same panel you’ll have access to the “trace” button, on the top part of the left panel.
By clicking the trace button you’ll be provided with all the trace functionalities:
-
Trace Type (you can chooses between):
-
connected elements (see all the connected elements around the selected object)
-
downstream (see all the connected elements from the selected object till the end of the network)
-
upstream (see all the connected elements from the selected object up to the source)
-
named configuration (custom queries configured on ESRI portal to cover any additional needs)
-
-
Tier: Utility tier
-
Starting Point: starting element to do the trace
-
Barriers: barrier to stop the trace in a specific point
Once Trace type, Tier and start point are selected, by clicking “Run Trace”, all elements of that trace will be highlighted. On the left panel, a list with all the elements found in the trace. By selecting one, the system will put a focus of that element on the map.
If you want to add a barrier in the performed trace, to see how the network would react by excluding a specific elements, you can click on the “+” button in the Trace Setting - Barrier section, you’ll be enabled to select an element directly on the map. That element will become a barrier for this search. You can add as many barriers as you want.
To delete a barrier or a starting point just swipe right to left on the element.