
Dynamic forms can be recalled from the entry menu at this path: Main menu > Data collection > Forms.
Figure - Sheets menu entry |
|---|
This form has the following structure:
-
a Table where dynamic forms are listed
-
a Filters panel on the right side of the page.
Dynamic Form List
In the “Forms” table, all sheets are visible to the user according to its visibility cone.
Each sheet has the following information:
-
Id;
-
Description;
-
Operation Center;
-
Type;
-
Scope;
-
WO Operation;
-
Scheduling user;
-
Status;
-
Inputs;
-
Mandatory Inputs;
-
Creation Date;
-
Creation Users;
-
Last Modified Date;
-
Last Modified User
On the top of the Forms table, the user can find:
-
Rearrange columns icon
-
Three dots menu icon
-
New form icon
Table operations:
Rearrange columns icon: through the show/hide and how to option, the user can access to all the available columns to re-arrange their order in the table.
Three dots menu icon: from this menu the user can access to the following operations:
-
New (Sheet). See next New Operation;
-
Refresh;
-
Export in Xslx.
Refresh
The user can update the dynamic forms in the tables and retrieve information, according to the filter’s criteria currently set.
Export in Xslx
The user can export all the dynamic form data, collected in the dynamic form, according to the filter’s criteria set. The data are exported in a common spreadsheet format: xslx.
The user can confirm or change the name proposed for the export then the file will be enqueued to be processed by a periodical batch task. When the task finishes to perform, the export file will be available in the “Report” Section, located on the floating right-side panel.
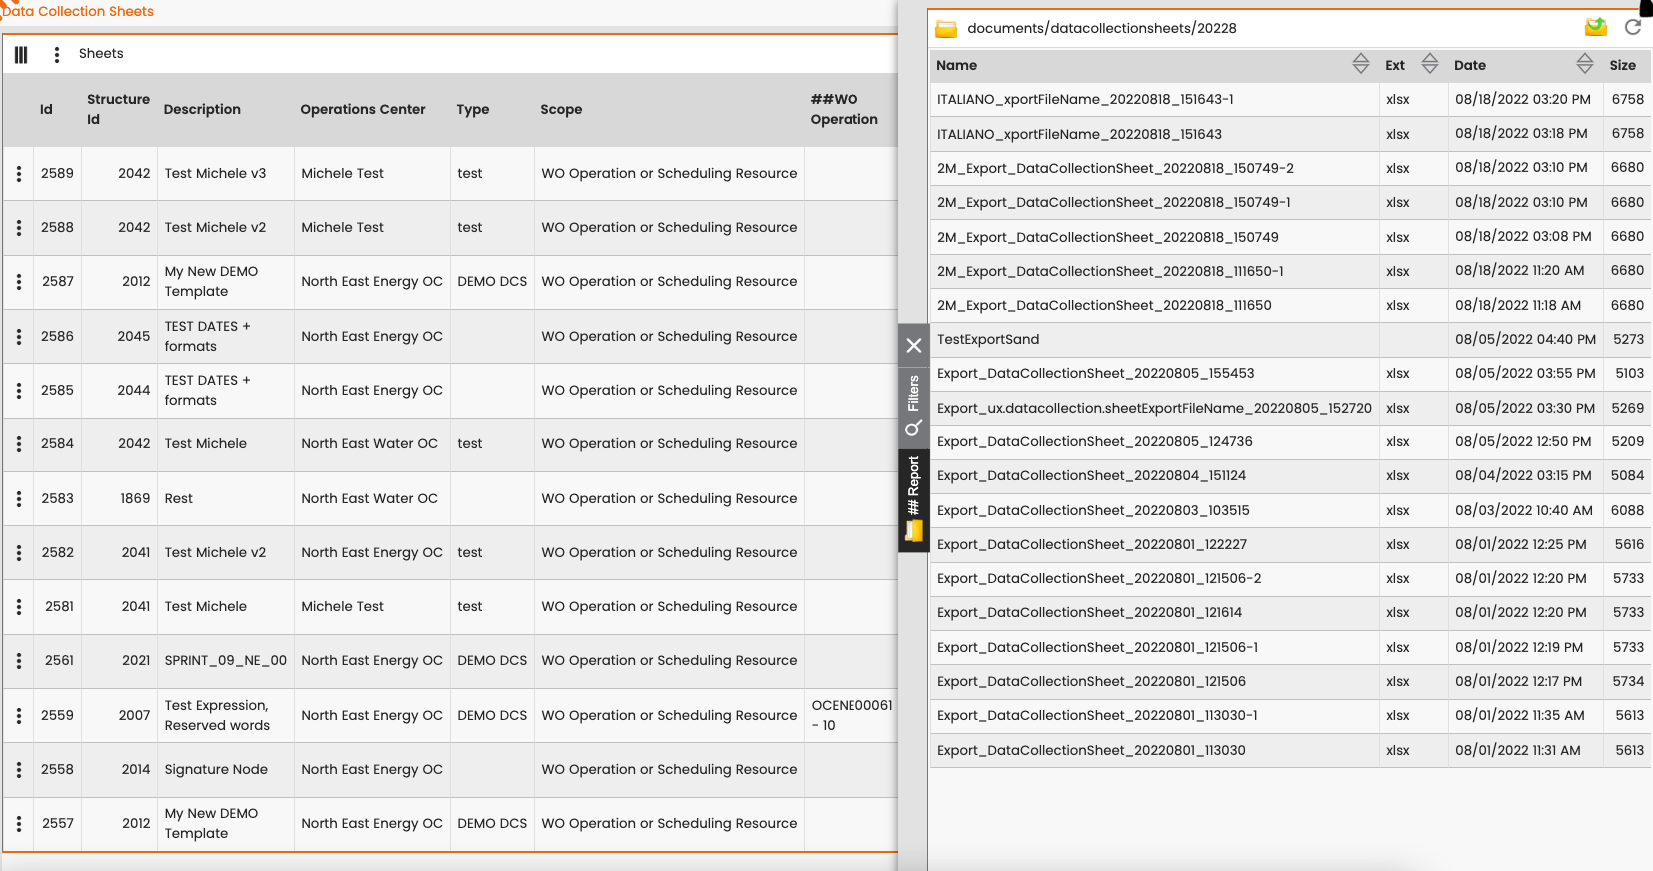
Figure - Report Section and exported dynamic form files |
From here, the user can download it and open in his preferred spreadsheet.
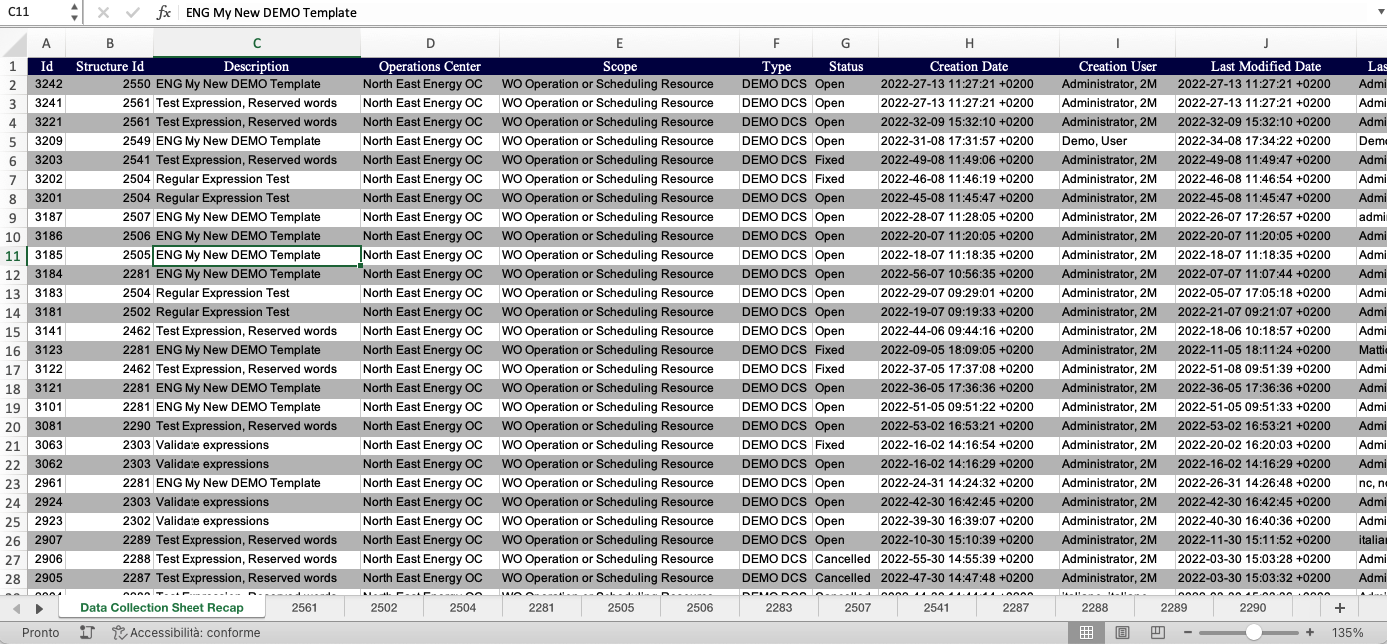
Figure - dynamic forms exported in xlsx format, first sheet “dynamic form recap” |
The first exported excel sheet is named “Dynamic Form Recap” which contains in each row every dynamic form exported with the main attributes, and the reference “Structure ID“ used to collect the input fields.
There are as many excel pages as different versions, used to create the cards. Each page contains expected nodes and the collected values.
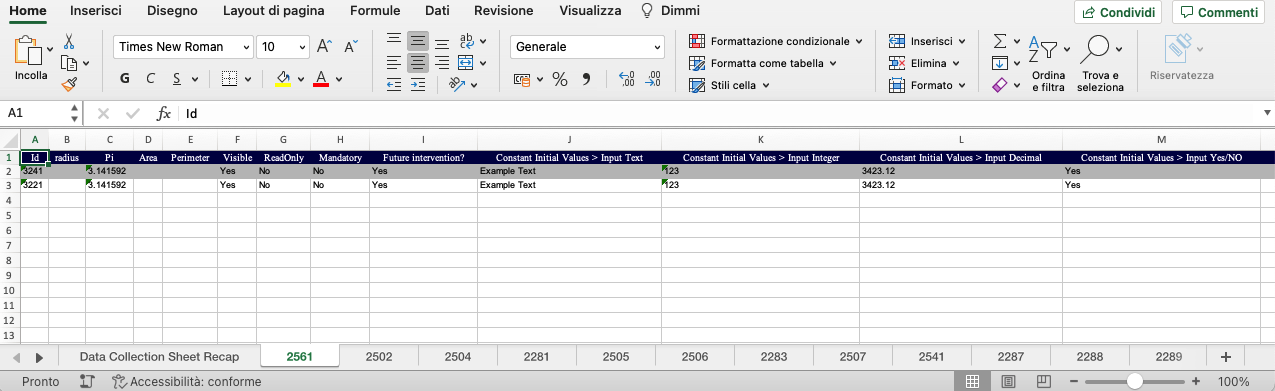
Figure - Dynamic forms exported in xlsx format, next sheets - data collected for nodes of specific release |
The system also produces a log that allows the user to monitor execution times and any alerts for the operator. The log is accessible from the "Elaboration Log" feature, selecting "Data Collection Excel Export" in the "Processing type" field and then performing the search.
It is important underlining that the “Export” functionality supports multi-lingual; so, all descriptions, nodes and selection items are exported in the language selected by the user to performs the export.
New operation.
Clicking on this item the user can create a new sheet using a pre-configurated dynamic form Template.
When the user recalls this operation, the system asks for the following information (panel shown in the below figure):
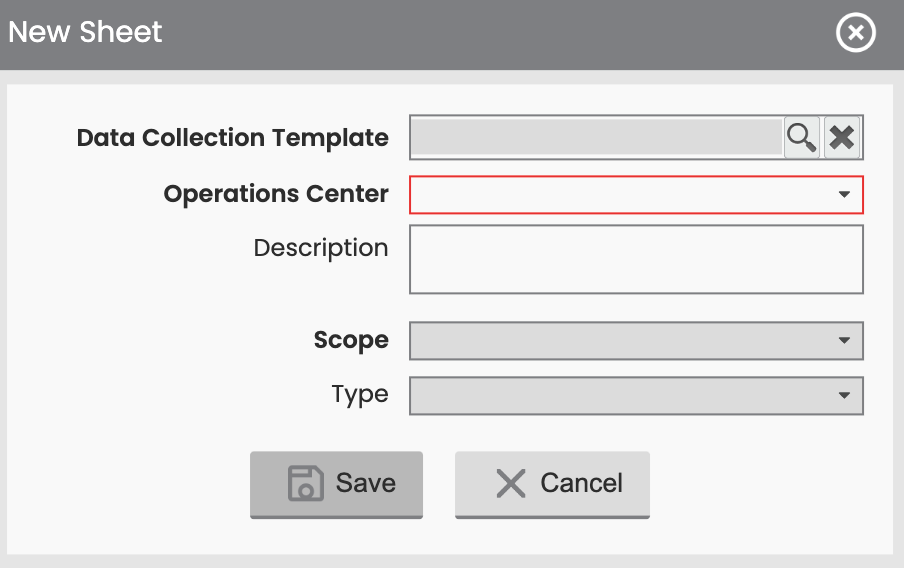
Figure - New, Dynamic Form Creation |
-
Dynamic Form Template: this is the template used to create a new form. The form model will be created according to the active and valid structure defined in the template. This is a mandatory information.
-
Operation Center: the operation center responsible for that form. This is a mandatory information.
-
Description: the name/description of the dynamic form. When the user selects a template, the description is acquired from the template’s description and can be changed if the user wants. This is an optional information.
-
Scope: it defines the possible use for that form, and it contains the following operation fields:
-
WO Operation: dynamic form must be assigned to a WO operation in order to work. When a form is assigned to a WO operation, this will be used when that work is running. If WO operations are spread into different interventions/days, or assigned to different technicians, dynamic form files may be filled- in, in different scheduling resources, because they’re connected to a WO.
-
Scheduling resource: the dynamic form must be assigned to a scheduling resource in order to work. When a form is assigned to a scheduling resource, it can be filled without referring to any specific WO operations. They have to be assigned to a specific scheduling resource.
-
WO operation or Scheduling resource: dynamic forms can be assigned to each of the previous mentioned cases.
-
The scope is a mandatory information and it’s automatically set. It acquires information from the template structure used.
-
Type: it’s used for categorizing different types of Templates and Forms, according to customer’s needs (different business, different objectives, different groups of people involved or other organizational issue).
Type is a mandatory information and it’s automatically set. It acquires information from the template structure used.
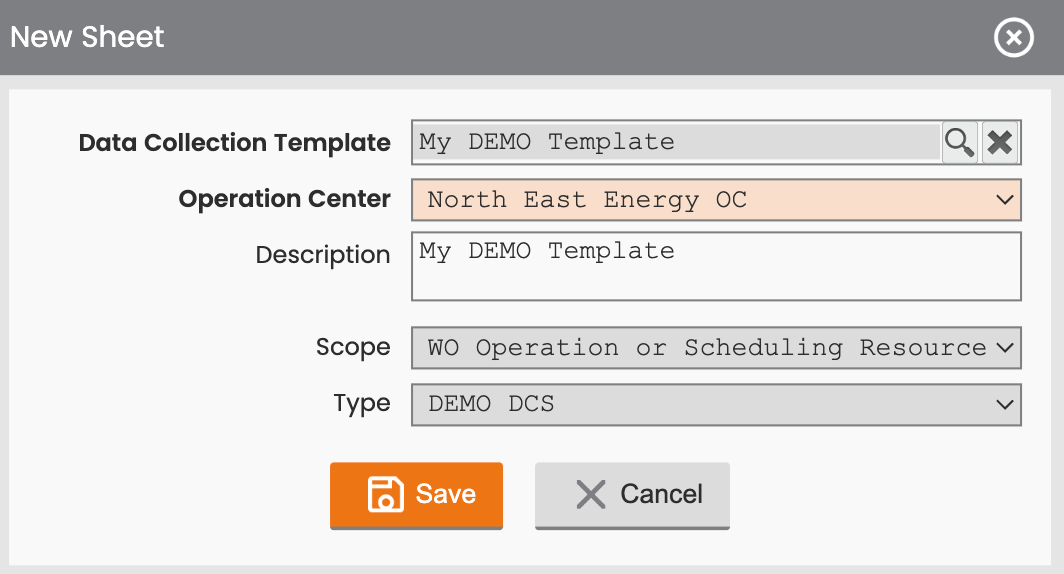
Figure - New dynamic form (Creation starting from a selected Template Structure) |
User can select the template by using a Template Picker as shown in next figure. The list proposes to the user only the active templates, according to the entered filter’s criteria.
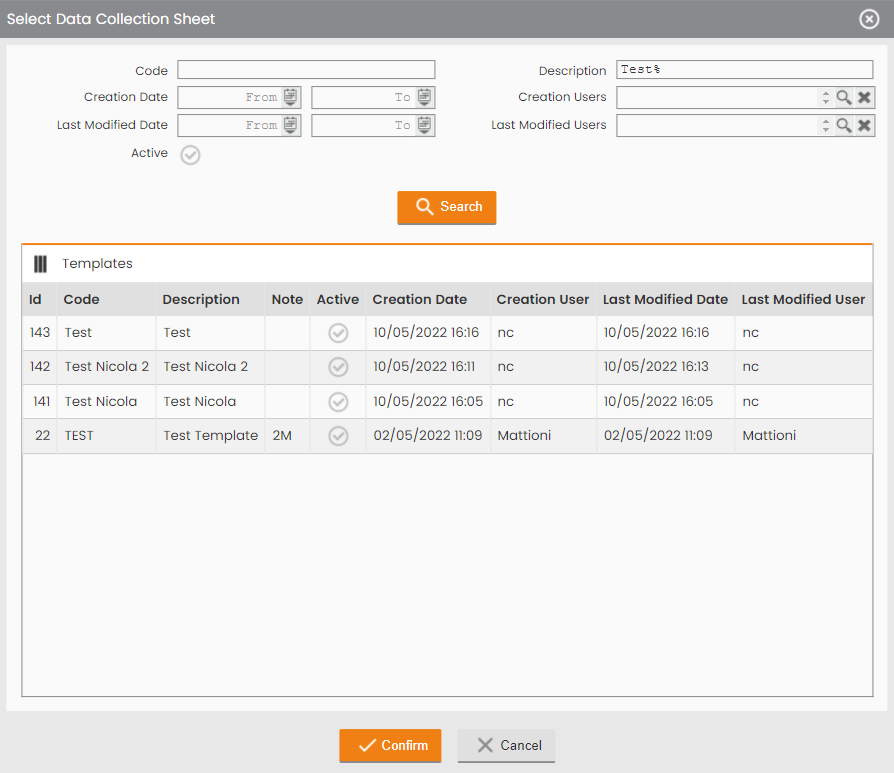
Figure - dynamic form template picker |
When the user press Confirm, the template is select and the system returns to the previous creation panel.
When all the mandatory information are inserted, the user can press the Save command button to create a new form or can press Cancel to abort the operation. Once saved, a new form is created.
The newly created form contains the following information:
-
ID: unique sequence number assigned by the system.
-
Description: description inserted by the user
-
Description: description inserted by the user or acquired from template version;
-
Operation Center: responsible for the form;
-
Type: acquired from template structure;
-
Scope: selected by the user;
-
WO Operation: not assigned yet;
-
Scheduling user: not assigned yet;
-
Status: at creation, form’s status is always open, it’s assigned automatically by the system;
-
Inputs: relationship between the fields filled-in in the form;
-
Mandatory Inputs: relationship between the mandatory fields filled-in and all the mandatory ones on the form;
-
Creation Date: date-time of form creation, managed automatically by the system;
-
Creation Users: user who created the form, managed automatically by the system;
-
Last Modified Date: date-time of the last update on the form, managed automatically by the system;
-
Last Modified Users: user who made the last change on the form, automatically managed by the system.
Row Operations
For each item in the table list, there is a three dots row menu (located on the left side), containing the following operations:
-
View Detail: the user can view or edit (according to granted permission) all the fill to fill-in organized in a tree hierarchical structure. You will find all the information about this feature in the next chapter “Dynamic Form Detail”.
-
View Template. With this option the user can inspect the Template Structure used to generate the template.
-
Associate Scheduling Resource. With this option the user can assign a dynamic form to be filled in on field by a specific technician. This feature is available only to a form with scope “Associable to Scheduling Resource” or “Associable to WO operation or to a Scheduling Resource” that are in an open status.
-
Dissociate Scheduling Resource. With this option the user can remove the association from a previously associate scheduling resource (view Associate Scheduling Resource). This feature is available only to form with scope “Associable to Scheduling Resource” or “Associable to WO operation or to a Scheduling Resource” that are in an open status and already linked with a scheduling resource.
-
Fix. With this option the user can fix the form previously assigned to a scheduling resource. So, this feature is available only to form with scope “Associable to Scheduling Resource” or “Associable to WO operation or to a Scheduling Resource” that are in an open status and already linked with a scheduling resource. At the operation’s end the dynamic form gains the Fixed Status. Only dynamic forms assigned to a Scheduling Resource in a Fixed status can be sent, to be worked on, to the mobile of the designated technician.
-
Cancel Form. With this operation the dynamic form is cancelled. Forms in a Cancelled Status can’t be reverted or changed, they remains in a read only final status.
-
Close Form. With this operation the dynamic form the user can bring the form in a Closed status, that is a valid final status. To be closed all the mandatory input fields in the dynamic forms have to be filled in. The close operation is available only for forms that are in fixed status (if assigned to work order requires also that the associated work order is in a closed status).
-
Export in Xls. With this operation the user can export the dynamic form data in a common spreadsheet format. It’s work. It works exactly like the massive export with the only difference that it will export only one row of data.
-
Export in PDF. With this operation the user can export the dynamic form data using the pre-configured PDF template. The PDF template is merged with the date belonging to dynamic form to be then saved/printed in a single PDF document.
Filter Panel
The filter panel could be used to guide the extraction of the results to be shown in the Forms table.
The filter panel is organized in sections named:
-
“Dynamic forms”;
-
“Dynamic Form Template”;
-
“Work Order”;
-
“Customer / Facility”.
When the user press “Confirm” button, the template is selected, and the system redirects the user back to the panel creation.
By inserting all the mandatory information, the user can create a new form by pressing the Save button to confirm or pressing the Cancel button to abort the operation.
The newly created form contains the following information:
-
ID: a unique sequence number assigned by the system.
-
Description: it’s the description inserted by the user or acquired from the template
-
Operation Center: responsible for the form;
-
Type: acquired from the template structure;
-
Scope : selected by the user;
-
WO Operation:not assigned yet;
-
Scheduling user: not assigned yet;
-
Status: automatically assigned by the system and it’s always in an open state when created.
-
Inputs:connection between the filled fields in the form;
-
Mandatory Inputs: connection between the mandatory filled fields and the ones on the form
-
Creation Date: date\time, managed by the system;
-
Creation Users: refers to the user who created the form, managed by the system;
-
Last Modified Date: date\time from the last update performed on the form, managed by the system;
-
Last Modified Users: user who made the last change on the form, managed by the system.
Row Operations
For each item presents on the table list, there is a three dots row menu located on the left side, containing the following features:
· View Detail : the user can view or edit (according to granted permission) all fields organized in a tree hierarchical structure (all information about this feature are described in the next chapter “Dynamic Form Detail”).
· View Template: the user can inspect the Template Structure used to generate the template.
· Associate Scheduling Resource : the user can assign a dynamic form from a specific technician. This feature is applied to the form having “Associable to Scheduling Resource” or “Associable to WO operation or to a Scheduling Resource” which are in an open status.
· Dissociate Scheduling Resource: the user can remove the association from a previous associate scheduling resource (view Associate Scheduling Resource). This feature is applied to a form having “Associable to Scheduling Resource” or “Associable to WO operation or to a Scheduling Resource” which are in an open status and already connected to a scheduling resource.
· Fix: the user can fix the form previously assigned to a scheduling resource. This feature is applied to a form having “Associable to Scheduling Resource” or “Associable to WO operation or to a Scheduling Resource” which are in an open status and already connected to a scheduling resource. At the end of the process, the dynamic form gets the “Fixed Status”. Only dynamic forms assigned to a Scheduling Resource in a Fixed status, are sent to the mobile to the technician’s mobile, waiting to be processed.
-
View WO: the user can consult (read-only option) the ODL associated with the data collection form. This function is available on the menu exclusively for that dynamic forms associated with a WO Operation.
-
Cancel Form: dynamic form is cancelled. Forms in a “cancelled” status can’t be reversed or changed, and they remain in a read-only status.
-
Close Form: the user can lead the form up to a Closed status, which is a final status. In order to close a dynamic form, all the mandatory input fields must be filled in. The closure operation is available only for dynamic forms in a “fixed status” (if assigned to a work order, it also requires, specific associated work order in a closed status).
-
Export in Xls: the user can export the dynamic form data in a common spreadsheet format, which works like the massive export but exporting only one row of data.
-
Export in PDF: the user can export the dynamic form data using the pre-configured PDF template. The PDF template is merged with the date belonging to dynamic form, and later saved/printed in a single PDF document.
Filter Panel
The filter panel could be used to manage the extraction of the results displayed in the form table.
The filter panel is organized in sections named:
· “Data Collection Sheets”;
· “Data Collection Template”;
· “Work Order”;
· “Customer / Facility”.
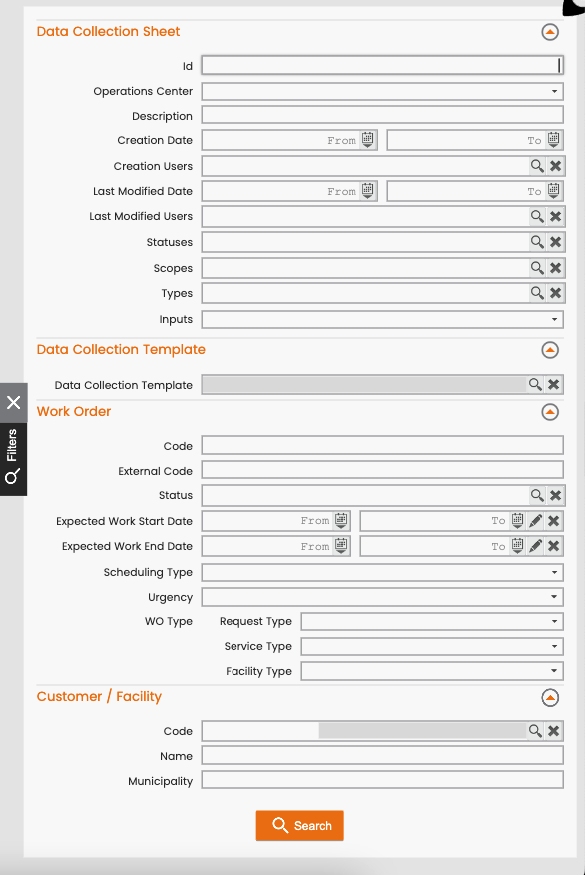
Figure - Dynamic Forms Search Window, Filters Panel |
|---|
Dynamic forms section
In the Dynamic Forms section the user can search for forms using search criteria:
-
ID;
-
Operation Center;
-
Description;
-
Creation Date;
-
Creation Users (you can select a set of users);
-
Last Modified Date;
-
Last Modified Users(you can select a set of users);
-
Statuses (you can select a set of statuses);
-
Scopes;
-
Types;
-
Inputs. The Inputs criteria allows you to search for: Never Filled In, Partially Filled In or Filled In dynamic forms or, in other words, about the completion of the dynamic form.
Data Collection Template section
In the Data Collection Template section the user can search for forms using these search criteria:
-
Data Collection Template.
The user can pick up the desired template to search for forms using many different criteria like: code, description, validity, creator user, scope, type,…
Work Order section
In the Work Order section the user can search for forms using these following search criteria:
-
Code;
-
External Code;
-
Status;
-
Expected Work Start Date interval;
-
Expected Work End Date interval;
-
Scheduling Type;
-
Urgency;
-
WO type triplet:
-
Request Type;
-
Service Type;
-
Facility Type.
-
Customer/Facility section
In the Customer / Facility section the user can search for forms using these following search criteria:
-
Code: Code of the customer/facility (works only form dynamic forms associated with a WO operation);
-
Name: Registered Name of the customer/facility (works only form dynamic forms associated with a WO operation);
-
Municipality: it references to the customer/facility (works only form dynamic forms associated with a WO operation);
Dynamic Form Detail
By clicking on a dynamic form in the list, the user can access to a form containing more information. The form is organized in two sections:
-
Header data;
-
Dynamic Form Structure and related information.
The header area is a collapsible section that shows general information about dynamic forms:
-
Id;
-
Status;
-
Scope;
-
Type;
-
Description;
-
Creation Date;
-
Creation User;
-
Last Modified Date;
-
Last Modified User;
-
Filled In Inputs;
-
Filled In Mandatory Inputs;
-
Inputs;
-
Mandatory Inputs.
The Dynamic Form Structure contains the list of the available fields/nodes in the form:
-
ID: unique sequence number assigned by the system to each node in the form, assigned at field’s creation time;
-
Color: color of the field chosen by the user to highlight the node;
-
Description: name of the node chosen by the user;
-
Code: code of the field. Actually is automatically, generated by the system at field’s creation time;
-
Note: free text notes inserted by the user;
-
Type: type of the node;
-
Value: shows the current value of the field, if present.
Dynamic forms section
In the Dynamic Form section, the user can apply to the form the following searching criteria:
· ID;
· Operation Center;
· Description;
· Creation Date;
· Creation Users (select a set of users);
· Last Modified Date;
· Last Modified Users (select a set of users);
· Statuses (select a set of statuses);
· Scopes;
· Types;
· Inputs: allows the user to search for: never filled-in, partially filled-in or filled-in dynamic forms.
Data Collection Template section
In the Data Collection Template section, the user can apply the following searching criteria:
-
Data Collection Template.
The user can select the desired template and apply, some different criteria such as: code, description, validity, creator user, scope, type, etc.
Work Order section
In the Work Order section, the user can apply to the form the following searching criteria:
-
Code;
-
External Code;
-
Status;
-
Expected Work Start Date interval;
-
Expected Work End Date interval;
-
Scheduling Type;
-
Urgency;
-
WO type triplet:
-
Request Type;
-
Service Type;
-
Facility Type.
-
Customer/Facility section
In the Customer / Facility section the user can apply to the form the following searching criteria:
-
Code: Code of the customer/facility (works only form dynamic forms associated with a WO operation);
-
Name: Registered Name of the customer/facility (works only form dynamic forms associated with a WO operation);
-
Municipality: it references to the customer/facility (works only form dynamic forms associated with a WO operation);
Dynamic Form Detail
By clicking on a dynamic form in the list, the user can access to a form containing more information. The form is organized in two sections:
-
Header data;
-
Dynamic Form Structure and related information.
The header area shows general information about dynamic forms such as:
-
Id;
-
Status;
-
Scope;
-
Type;
-
Description;
-
Creation Date;
-
Creation User;
-
Last Modified Date;
-
Last Modified User;
-
Filled In Inputs;
-
Filled In Mandatory Inputs;
-
Inputs;
-
Mandatory Inputs.
The Dynamic Form Structure contains the list of the available fields/nodes in the form:
-
ID: a unique sequence number assigned by the system to each node in the form, assigned at field’s creation time;
-
Color: color of the field selected by the user to highlight the node;
-
Description: name of the node chose by the user;
-
Code: code of the field, automatically generated by the system at field’s creation time;
-
Note: free text notes inserted by the user;
-
Type: type of the node;
-
Value: shows the current value of the field, if presents.

Figure - Dynamic Form Detail |
Table operations
On the top of the Tree table we have
-
Rearrange columns icon
-
Three dots menu icon
Rearrange columns icon: the user can access all the available columns and choose how to re-arrange their order in the table, through the show/hide feature.
Three dots menu icon: can access the following operations:
-
New Input Field. See next New Input Field Icon.
Row operations
For each item in the table list there is a three dots row menu, located on the left side, containing the following operations:
-
Fill-In: the user can fill-in the selected node inserting a value or modifying a previous inserted value. Once selected, a Dialog panel asks to the user for the value for the node.
Table operations
On the top of the Tree table structure the user can find:
-
Re-arrange columns icon
-
Three dots menu icon
Rearrange columns icon: the user can access all the available columns and choose how to re-arrange their order in the table, through the show/hide feature:
Three dots menu icon: the user can access to the following operations:
-
New Input Field. See next New Input Field Icon.
Row operations
For each item presents on the table list, there is a three dots row menu located on the left side, containing the following operations:
-
Fill-In: the user can fill-in the selected node, inserting a value or modifying a value previously inserted. While selected, a Dialog panel asks to the user for the value for that node.
|
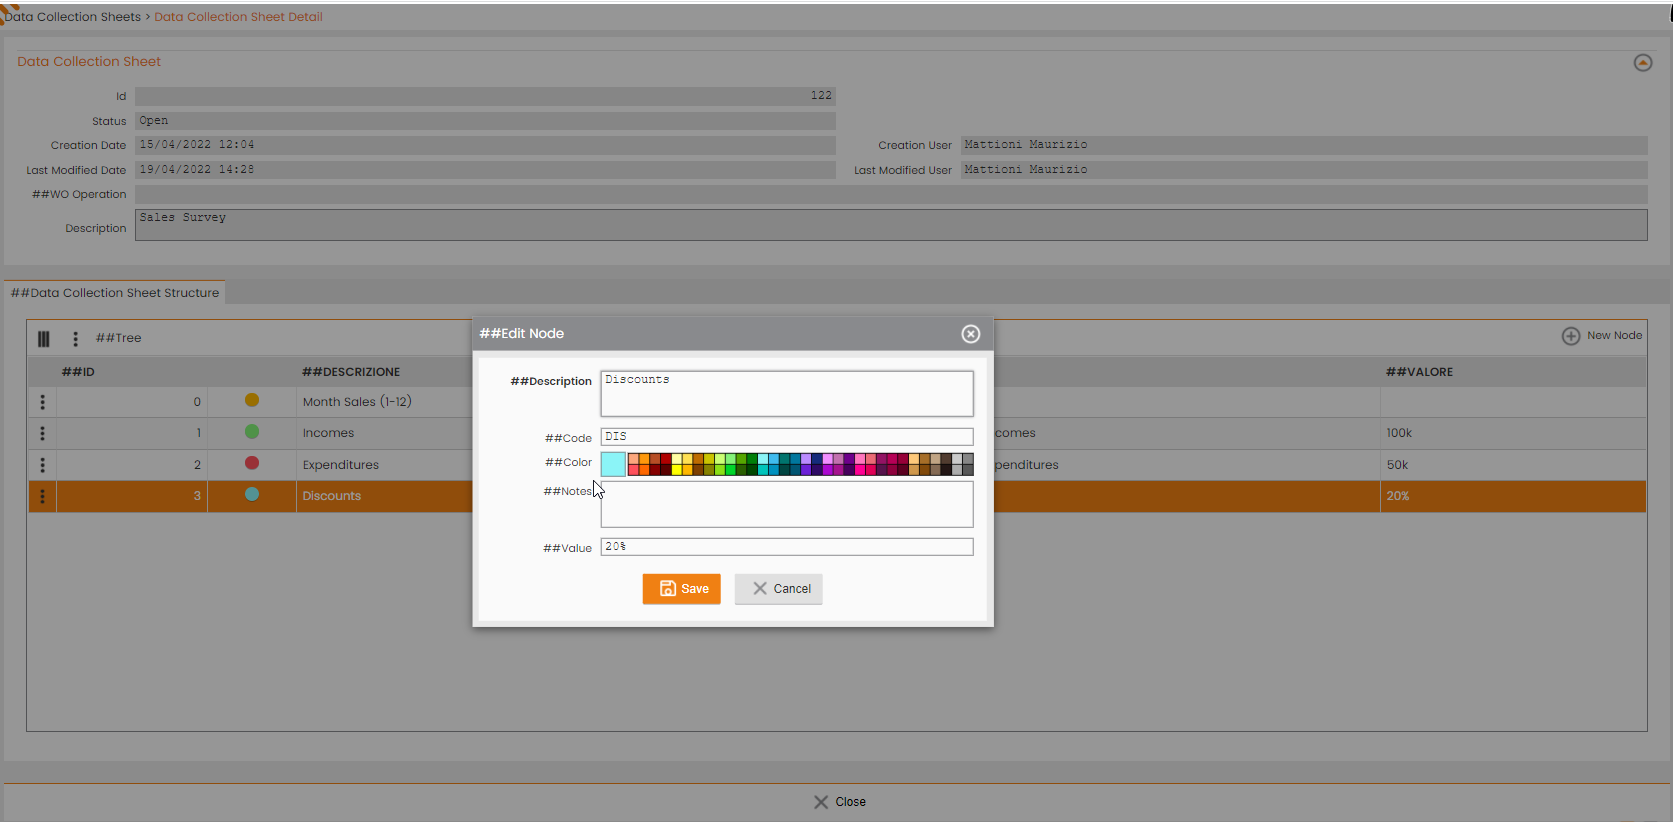
Figure - panel for editing node properties |
|
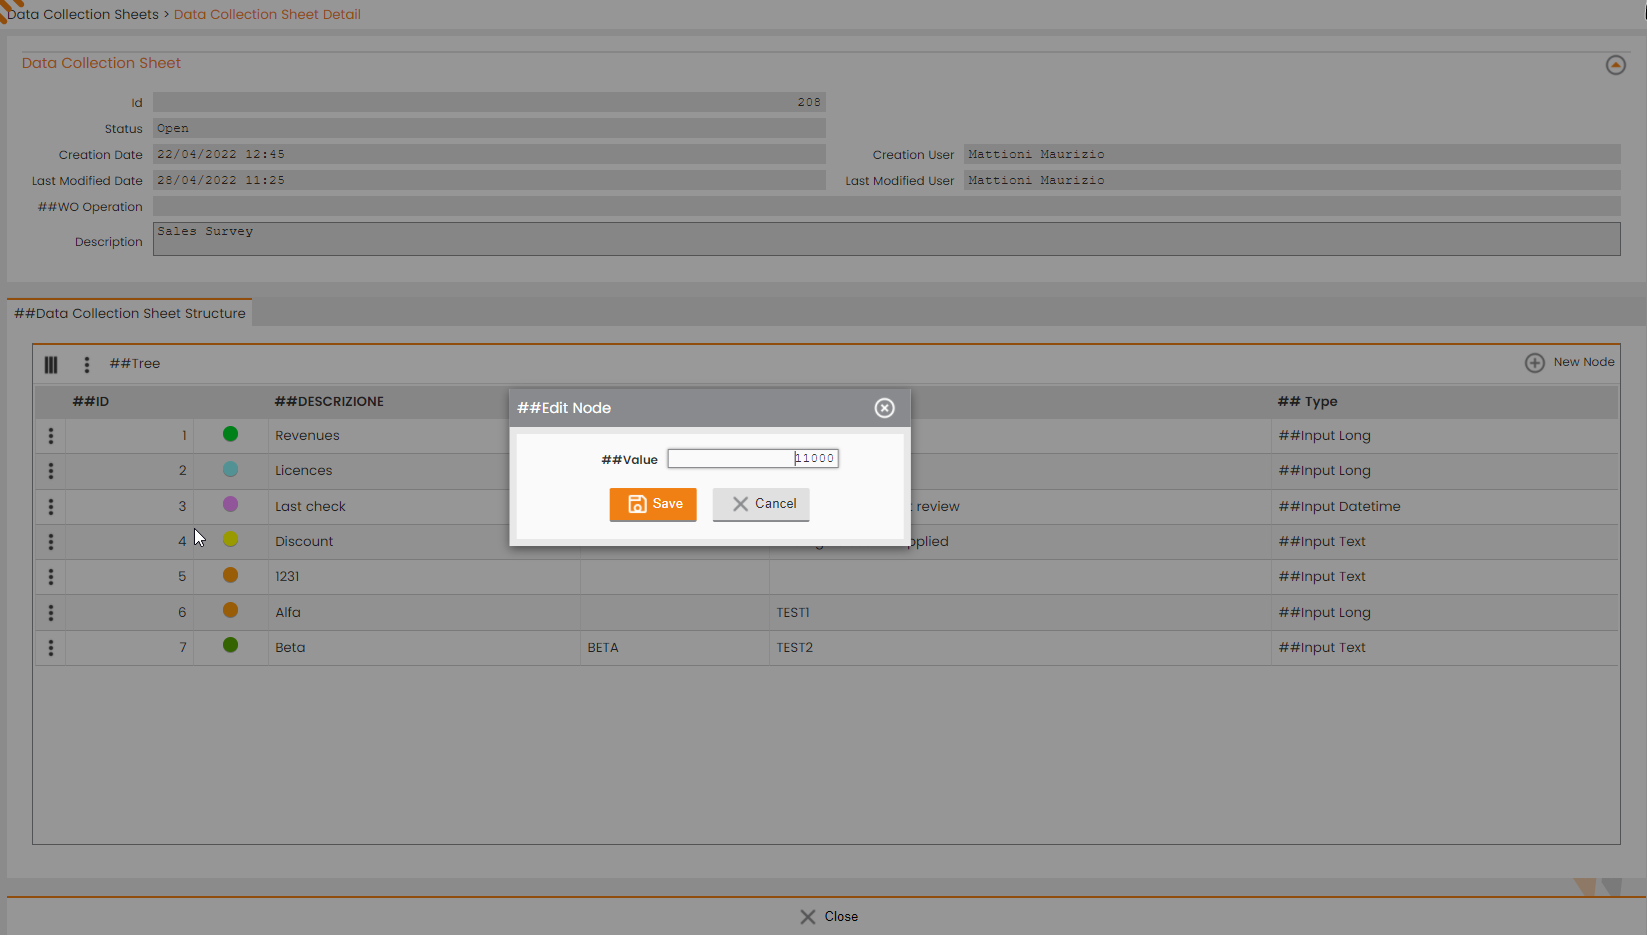
Figure - panel for inserting/editing the value to the node |
Different Types of nodes
By using dynamic forms, different types of input fields can be managed.
Each different type of node ID must contain a specific data domain and a specific functioning.
Here’s a list of Input Fields’s type:
-
Integer Number input field;
-
Text input field;
-
DateTime input field;
-
Input Yes/No;
-
Decimal Number input field;
-
Selection input field;
-
Multiselection input field;
-
Coordinates input field;
-
Barcode input field;
-
Attachment input field;
-
Photo input field;
-
Signature input field
-
Radio input field
-
Checkbox input field
-
Matrix input field
Integer Number Input Field:
Using the Long input field, the user can collect a long value (i.e. big integer value with sign).
According with the definition of the node, the field manages validation rules:
· inserted/update value must be specified between a Min and Max thresholds.
Initially the input field is proposed as empty.
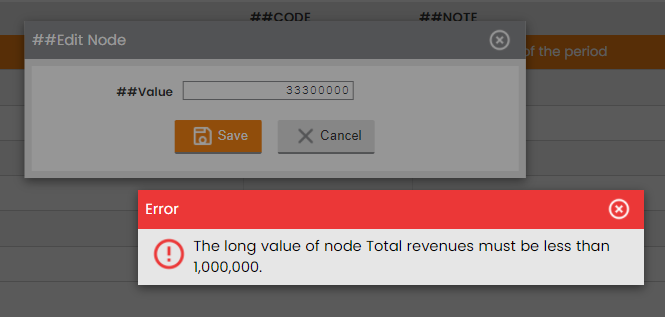
Figure - Long Input Field |
Text Input Field:
Using the Text input field, the user can collect a text value.
According with the definition of the node, the field manages validation rules:
-
inserted/update value must have a length between Min and Max (numbers of characters).
Initially the input field is proposed as empty.
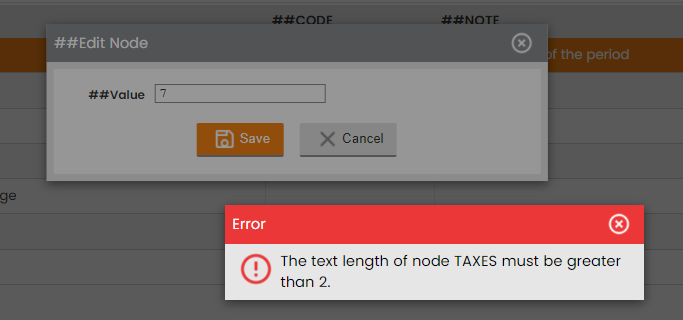
Figure - Long Input Field |
Date\time Input Field:
Using the Datetime input field, the user can collect a text value.
According with the definition of the node the field manages validation rules:
-
inserted/update value must be in a range between a thresholds Min Date and Max Date.
The date can be can be entered by typing the value or by using dedicate picker to set date and time.
Initially the input field is proposed as empty.

Figure - Long Input Field |
Yes/No Input Field:
Using the Yes/No input field, the user can collect a response value.
There are not any validation rules. The system only checks that the user enters a Yes or No value.
Initially the input field is proposed as empty (i.e. No Yes or No value is set by default).
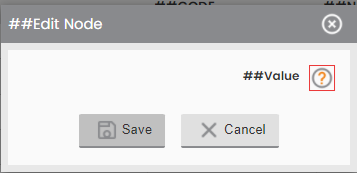
Figure - Long Input Field |
Decimal Number Input Field:
Using the Real input field, the user can collect a real value.
According with the definition of the node the field manages validation rules:
-
inserted/update value must be between a specified Min and Max thresholds;
-
inserted/update value cannot use a number of integer digits greater than Max Integer Digits;
-
inserted/update value cannot use a number of integer digits greater than Max Decimal Digits.
Initially the input field is proposed as empty.
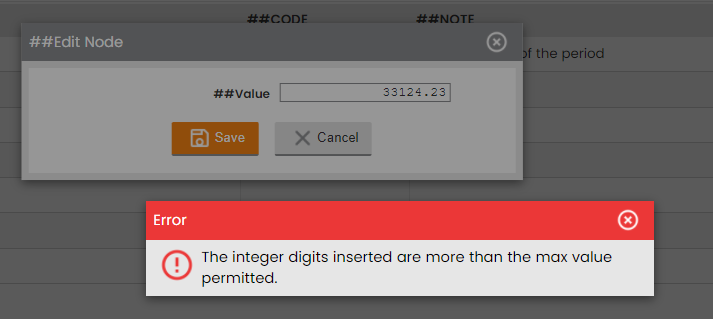
Figure - Long Input Field |
Selection Input Field:
Using the Selection input field, the user can collect a value belonging to a discrete set.
According with the definition of the node the field manages validation rules, so inserted values must be configured for the corresponding node in the dynamic form template.
Initially the input field is proposed as empty.
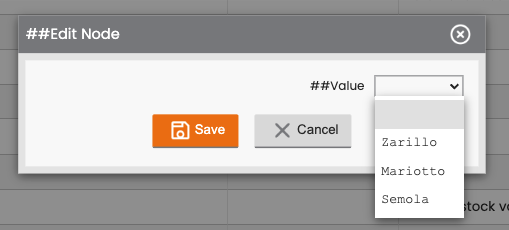
Figure - Selection Input Field |
Multi-selection Input Field:
Using the Multi-selection input field, the user can collect a set of values belonging to a discrete set of candidates.
According with the definition of the node the field manages validation rules so inserted values must be configured for the corresponding node in the dynamic form template.
Initially the multi-selection input field is proposed as empty. The user can define the multi-selection by dragging the desired values from the “Available” box to the “Selected” one.
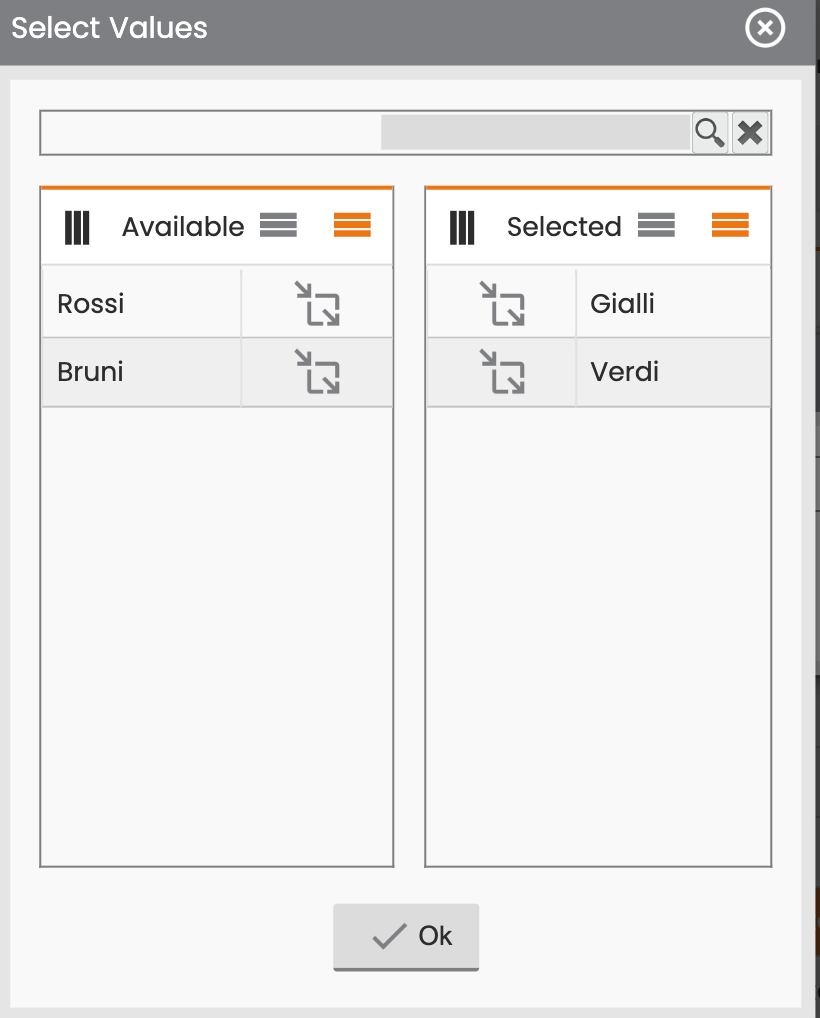
Figure - value selection for the multi-selection input field |
Once selection is confirmed, the selected values appears in the “Value” field (see figure here below):
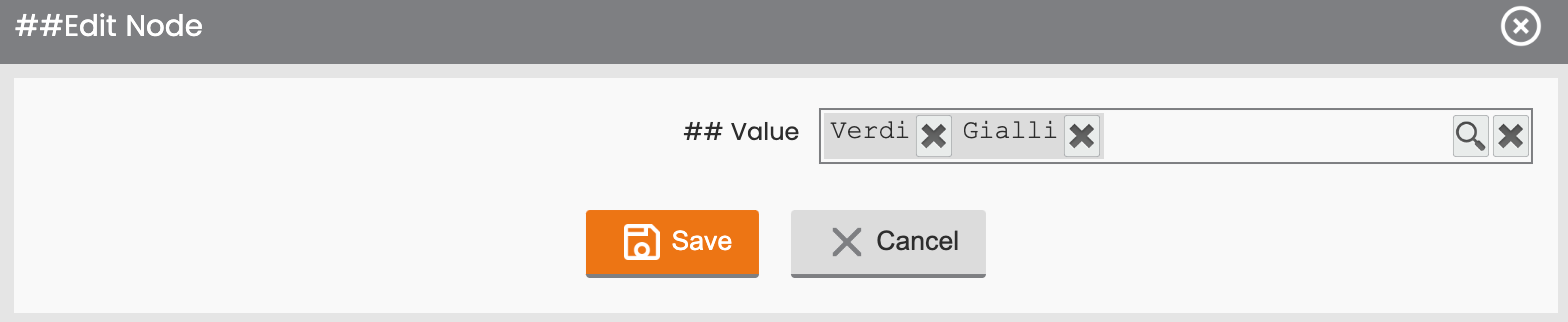
Figure - coordinates Input Field |
Coordinate Input Field
Using the Coordinates input field, the user can collect a coordinate type value.
On server-side user can fill this input field manually, by inserting two real values for latitude and longitude
Latitude must relay in the interval [-90,000000, 90,000000], longitude in the interval [-180,000000, 180,000000],
On the mobile side the user can fill this input field manually or automatically. In this case using the dedicated command button, the user can request to the mobile device to get current coordinate from the dynamic form receiver (receiver must be turned on).
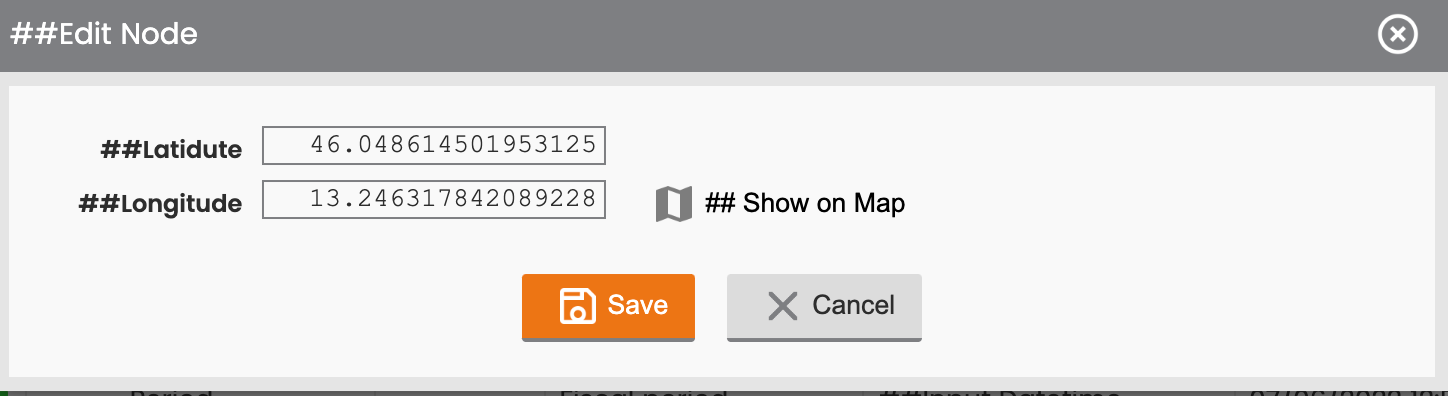
Figure - coordinates Input Field |
When a couple of coordinates are inserted, “the Show on Map” operation from server side, becomes available from the right side (see above figure).
Show on Map:
Using this operation, the user can view the acquired position for the coordinate’s node on a cartographic panel. In this panel the user can center the point and/or zoom in/out until reaches the desired detailed level.
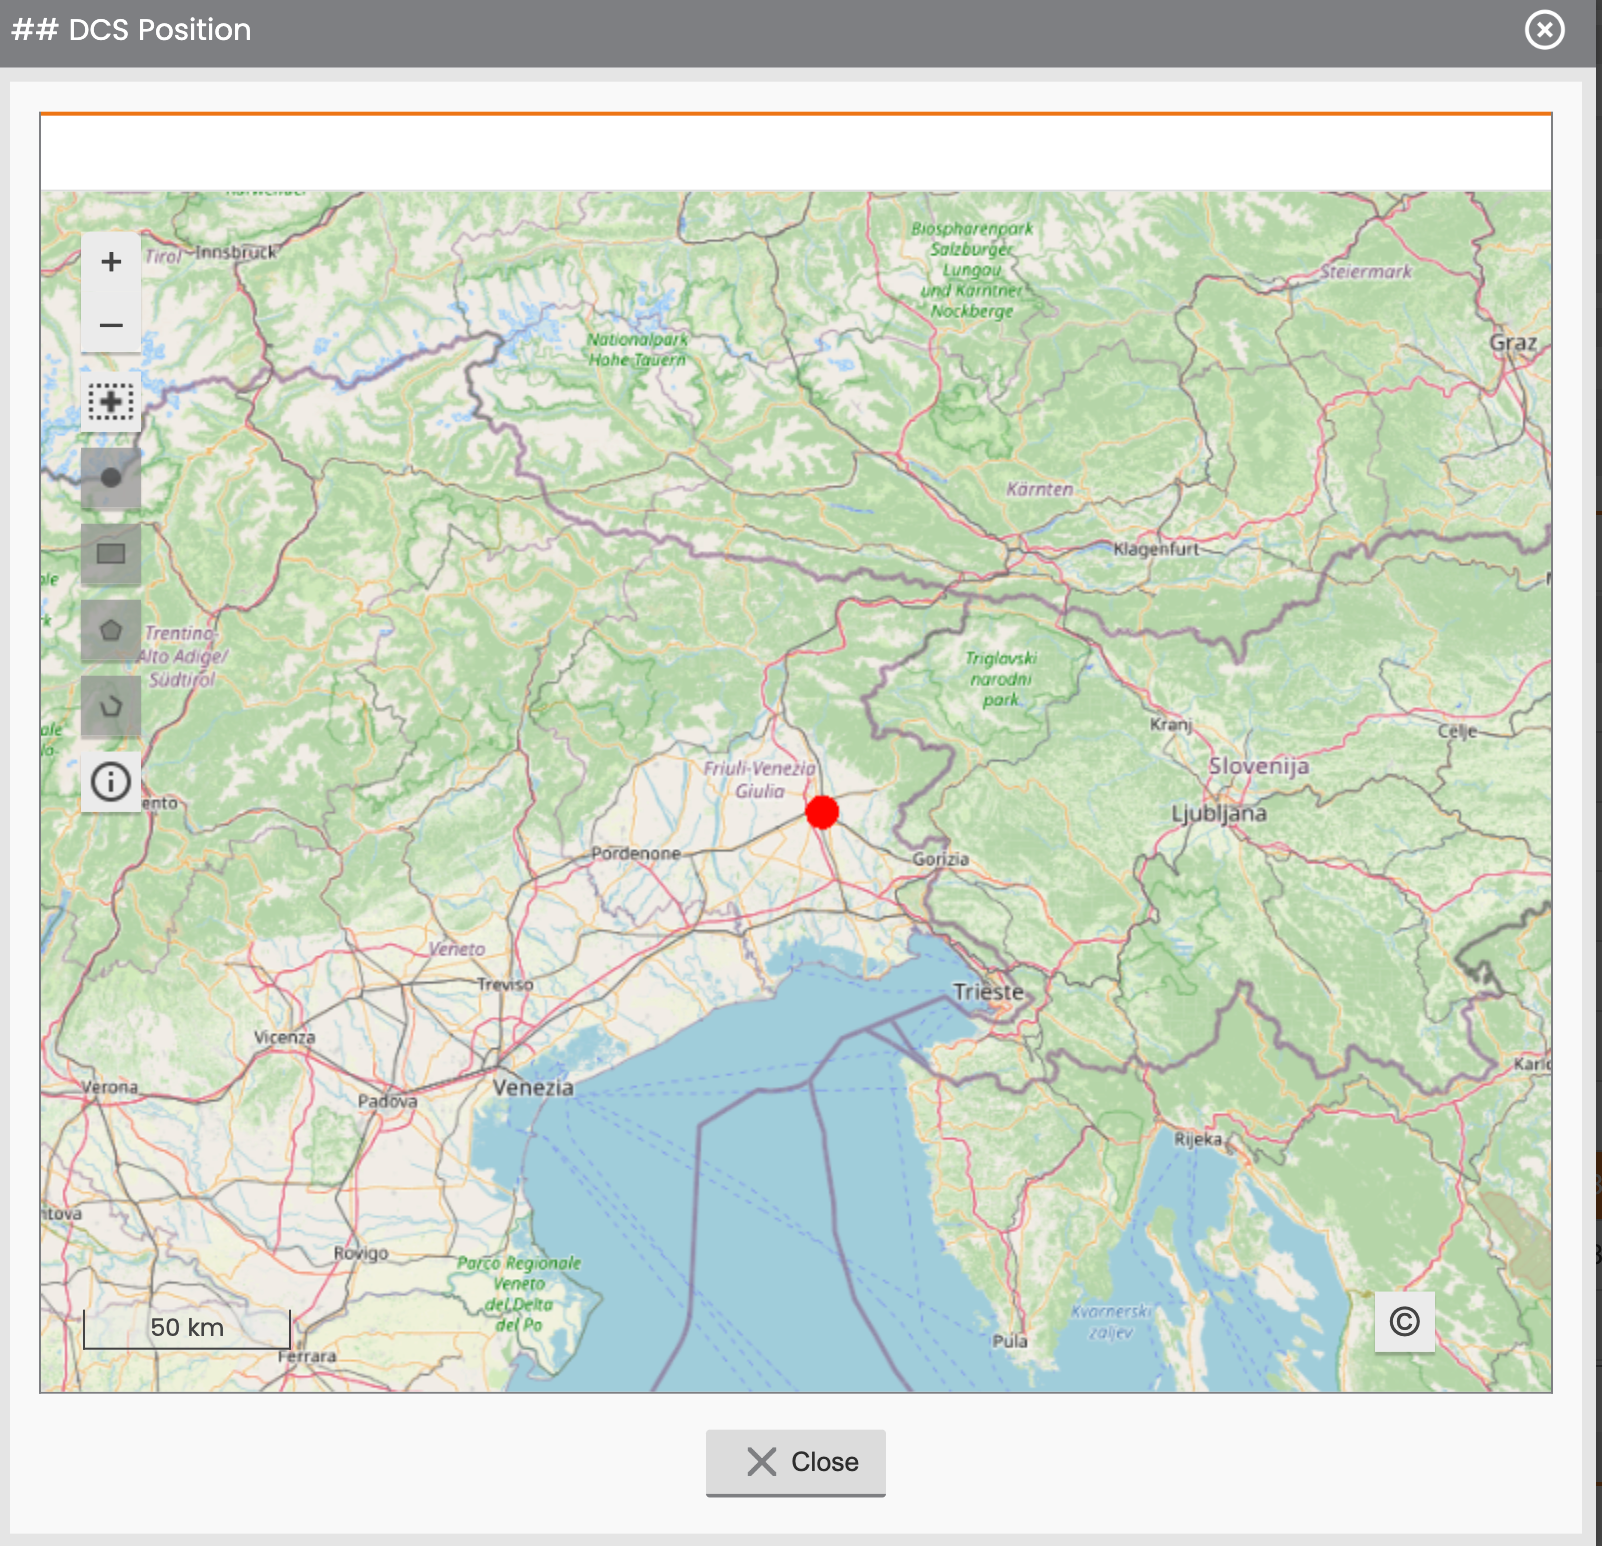
|
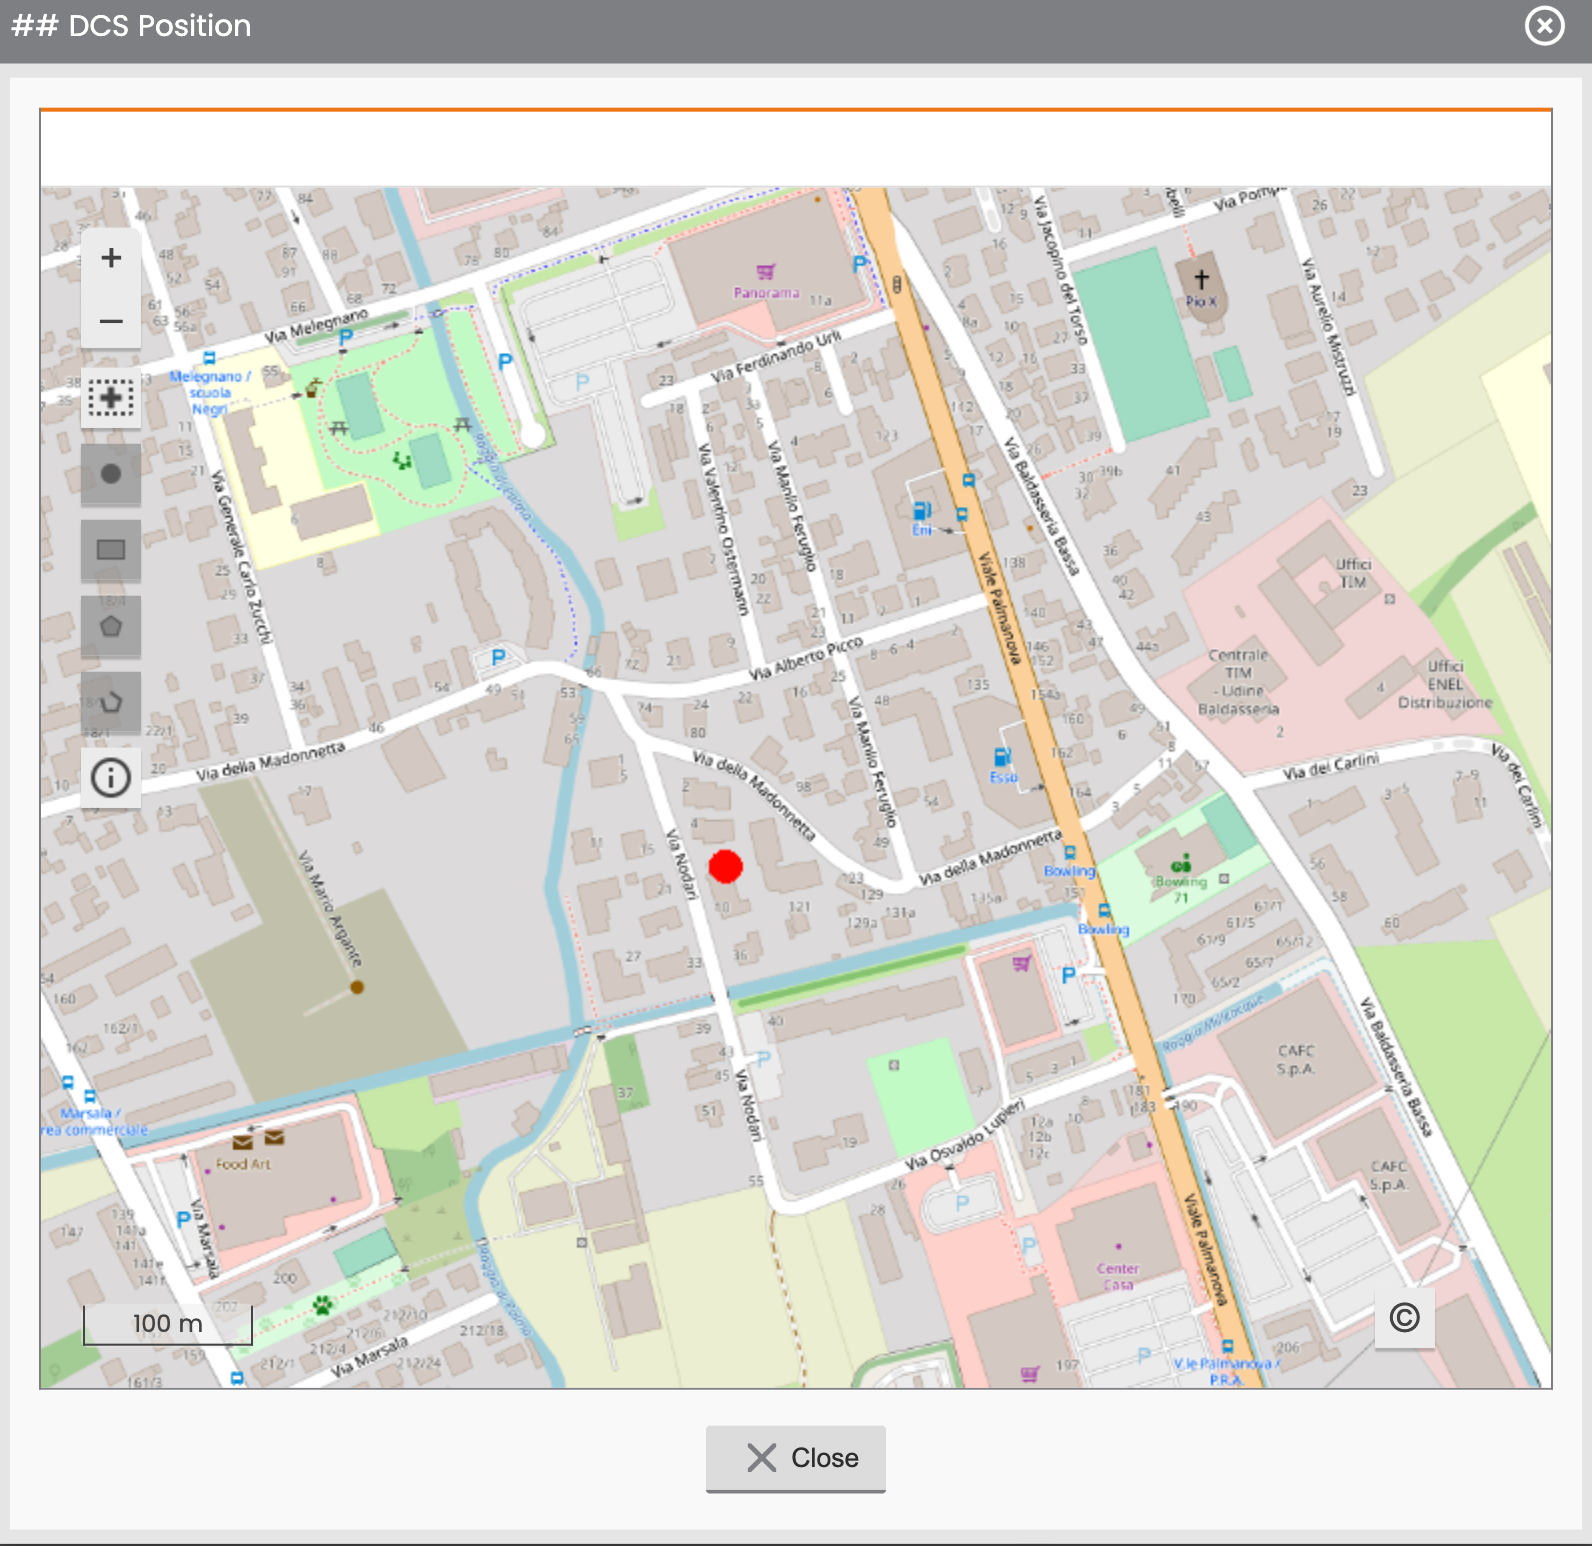
tight zoom |
|
Figure - view acquired coordinates on the Map |
|
Barcode Input Field
Using the Barcode input field, the user can collect a text value using a barcode scanner.
The barcode scanner is available only from mobile. On server is only possible to view the acquired valued or modifying it using a text field.
Initially the multi-selection input field is proposed as empty.
Depending on the scanned barcode, the value on the field can be filled with a number (i.e. EAN 13, EAN 8, Interleaved 2/5,.. ) or with a long text (i.e. QR codes, Codabars, Code128, Code39,..).
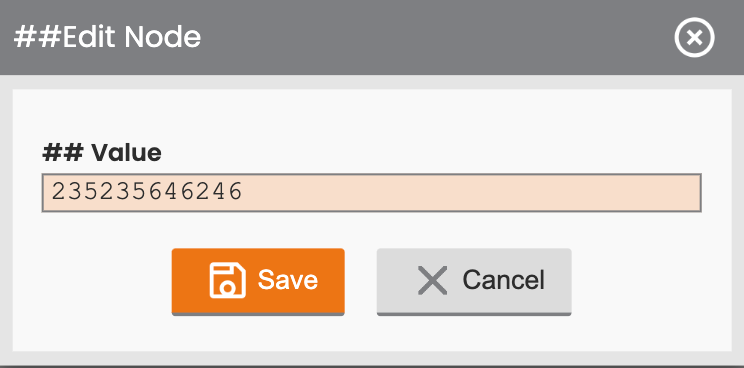
Figure - coordinates Input Field |
Barcode field, for further information about acquiring a barcode on mobile side.
Attachment Input Field
Using the Attachment input field, the user can upload an attachment file picking it up from his library.
According to the definition of the node the field manages validation rules, so the uploaded file must comply with the assigned maximum size and the allowed file’s types.
Initially the input field is proposed as empty.
If the input field is empty, the user can upload an attachment by clicking on the plus icon.
If an attachment is already uploaded, the user may use the plus icon to change or download it, through a dedicated installed application.
To download the file, the user can click to the green arrow to select the export path on the file system.
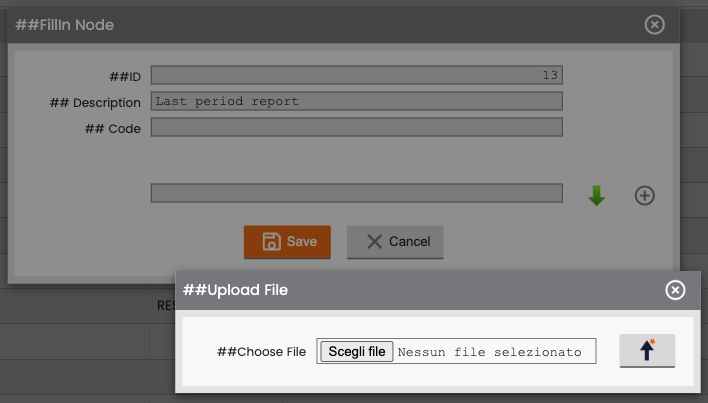
Figure - Attachment Input Field, Upload option |
Photo input field:
Using the Photo input field, the user can upload photo, picking it up from the library.
According with the definition of the node, the field manages validation rules, so the uploaded file must comply with the maximum size assigned and the file’s types allowed.
Initially the input field is proposed as empty.
If the input field is empty, the user can upload an attachment by clicking on the plus icon.
If an attachment is already uploaded the user may use the plus icon to change it or view/download it.
To view/download the file the user can click to the green arrow to select the export path on the file system.
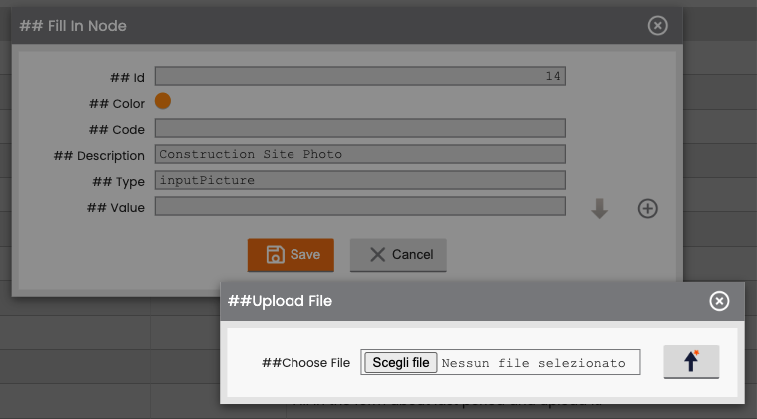
Figure - Attachment Photo Field, Upload option |
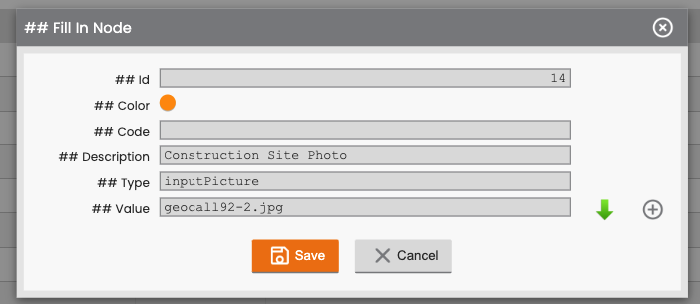
Figure - Attachment Photo Field, Download/View option |
Signature input field:
Using the Signature input field, the user can upload an image containing the signature, by picking it up from the library.
According with the definition of the node, the field manages validation rules so the uploaded file must comply with the maximum size assigned and the file’s types allowed.
Initially the input field is proposed as empty.
If the input field is empty, the user can upload an attachment by clicking on the plus icon.
If an attachment is already uploaded, the user may view it in a thumbnail or use the plus icon to change it.
To view/download the already uploaded file, the user can click to the green arrow to select the export path on the file system.
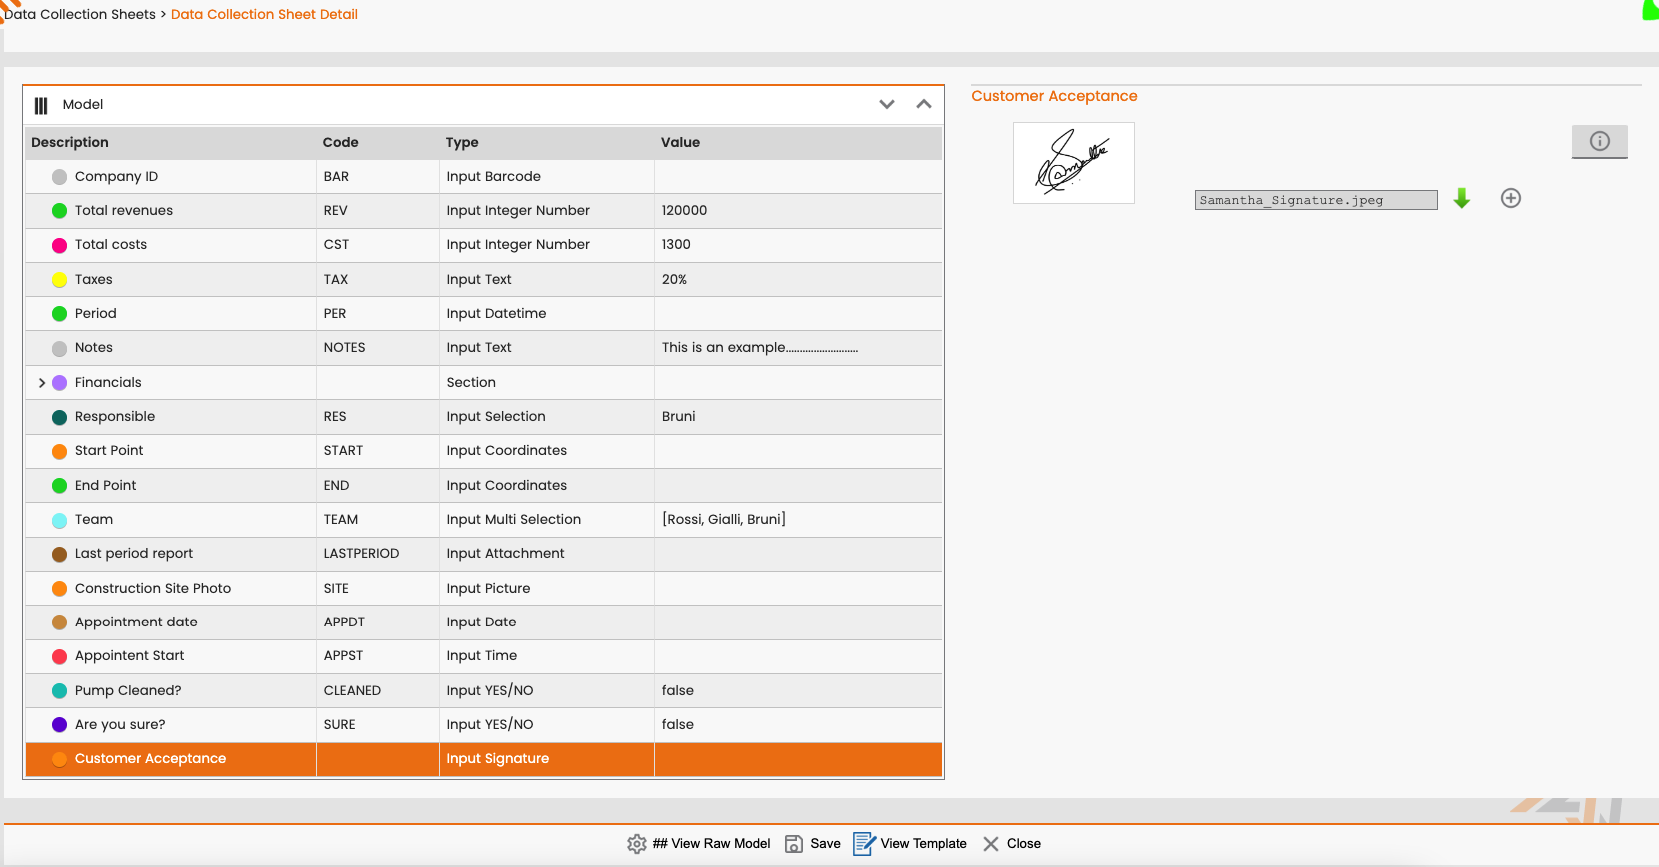
Figure - Attachment Photo Field, Upload option |
Radio button input field (FSM 20.0):
This node works as the Selection Input Field but provide a visualization with Radio buttons or with a table that can contains also a description text.
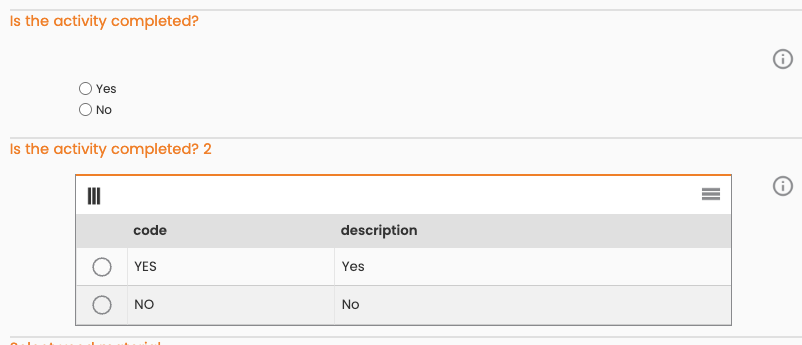
Figure - Option input field |
Checkbox input field (FSM 20.0):
This node works as the Multi-selection Input Field but provide a visualization with Checkboxes or with a table that can contains also a description text.
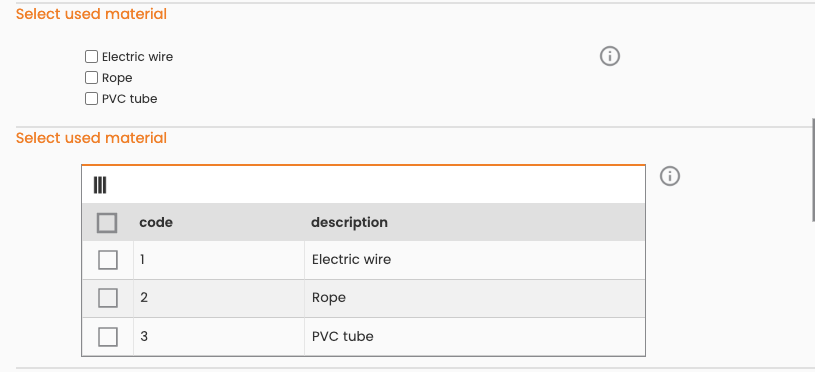
Figure - Checkbox input field |
Multi-Attachments input field (FSM 20.0):
This node provide a table in which the user can loads one or more attachments depending on the template configuration
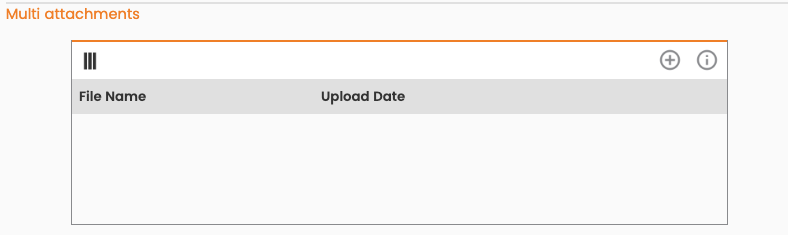
Figure - Multi-Attachments input field |
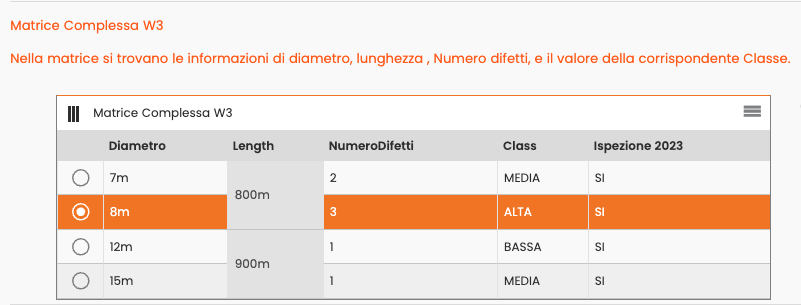
Matrix node type (FSM 21.0)
The matrix node is introduced to give the user the possibility to uniquely select between combinations of values having the possibility of being able to view them as a matrix.
Required, visible and read-only Input Fields
For each input field in the template, the corresponding node (see also DCS - DC Templates, Expression ) can have visible and read-only properties or mandatory ones to be set.
These properties can affect the input field, displayed to the user: if it’s about mandatory fields, or visible to the user (not visible input fields can be used to memorize values to use in formulas), and if they are viewed only in a “read-only” mode (read-only fields can be useful when the system calculates a value that the user needs to see but without changing).
These properties are derived from evaluating expressions defined on the node in the template. Expressions can use constants, field’s values and predefined operators and also function to derive the value for required input fields (see DCS - DC Templates, expressions for further details ).
Dynamic Form Status and Status update
Dynamic forms can acquire the following status:
-
OPEN;
-
FIXED;
-
CLOSED;
-
CANCELED.
Here below few detailed status information and the corresponding upgrades for each form type.
When a dynamic form is generated, is always in an OPEN status. An open form can later change in a FIXED, CANCELLED or in a CLOSED status, depending on manual user’s action.
The form can change in a FIXED status when the next work cycle is scheduled: the form is assigned to a scheduling resource or is assigned to a work order that is validated to be send to the assigned resource. When the form reaches the FIXED status, it can’t no longer be reassigned to another scheduling resource or WO operation.
Only FIXED dynamic forms are sent to technician’s mobile.
If the action succeeds, the dynamic form passes in CANCELLED status (final step) and the user can cancel it. Cancelled dynamic forms are no longer valid (i.e. Cancelled dynamic forms can’t be picked-up and associated to a WO operation). Previously CLOSED dynamic forms can’t be cancelled.
The user can also close a dynamic form: it can be closed only if all the mandatory field are filled-in, if the action succeeds the dynamic form passes in a CLOSED status (final step) otherwise it remains in an Open State (an information message is shown to the user).[CB1]
Closed dynamic forms are no longer editable. Previously CANCELLED dynamic forms can’t be closed.
A WO operation can be associated to a dynamic form as per the following circumstances:
· when the intervention is about to be debriefed:
o if the dynamic forms have mandatory fields not filled, related to an outcome reason which requires, for the forced compilation of the mandatory fields then the debriefing closure action will be blocked, and an informational message shown to the user[CB2] ;
· when the user tries to close a WO operation, all the associated dynamic forms in an OPEN state, will try to evolve the CLOSED state.
o If a dynamic form has at least one “not-filled” field yet, it remains in the previous state as before, without blocking the closure of the operation.
· when the user tries to cancel a WO operation, the associated dynamic form in an OPEN status, will try to evolve the CANCELLED state.
|
|
|
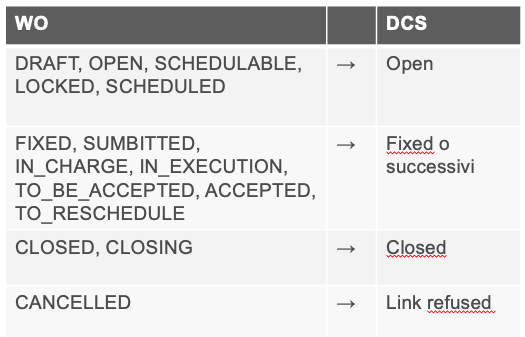
Sheet / WO associability |
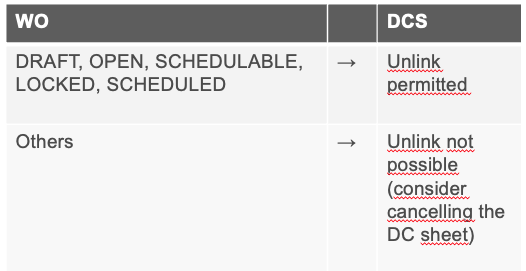
Sheet / WO Disassociability |
Operations
At the bottom of Dynamic Form Template Structure Detail, the user can find the following operations:
-
View Raw Model;
-
Save
-
View Template;
-
Close.
View Raw Model
This feature allows the user to inspect the structure of the current dynamic form in a JSON format. This can be useful when the user wants to check the structure returned by the Get model REST API (i.e. GET /core/r1/data collection/forms/{id}/model).
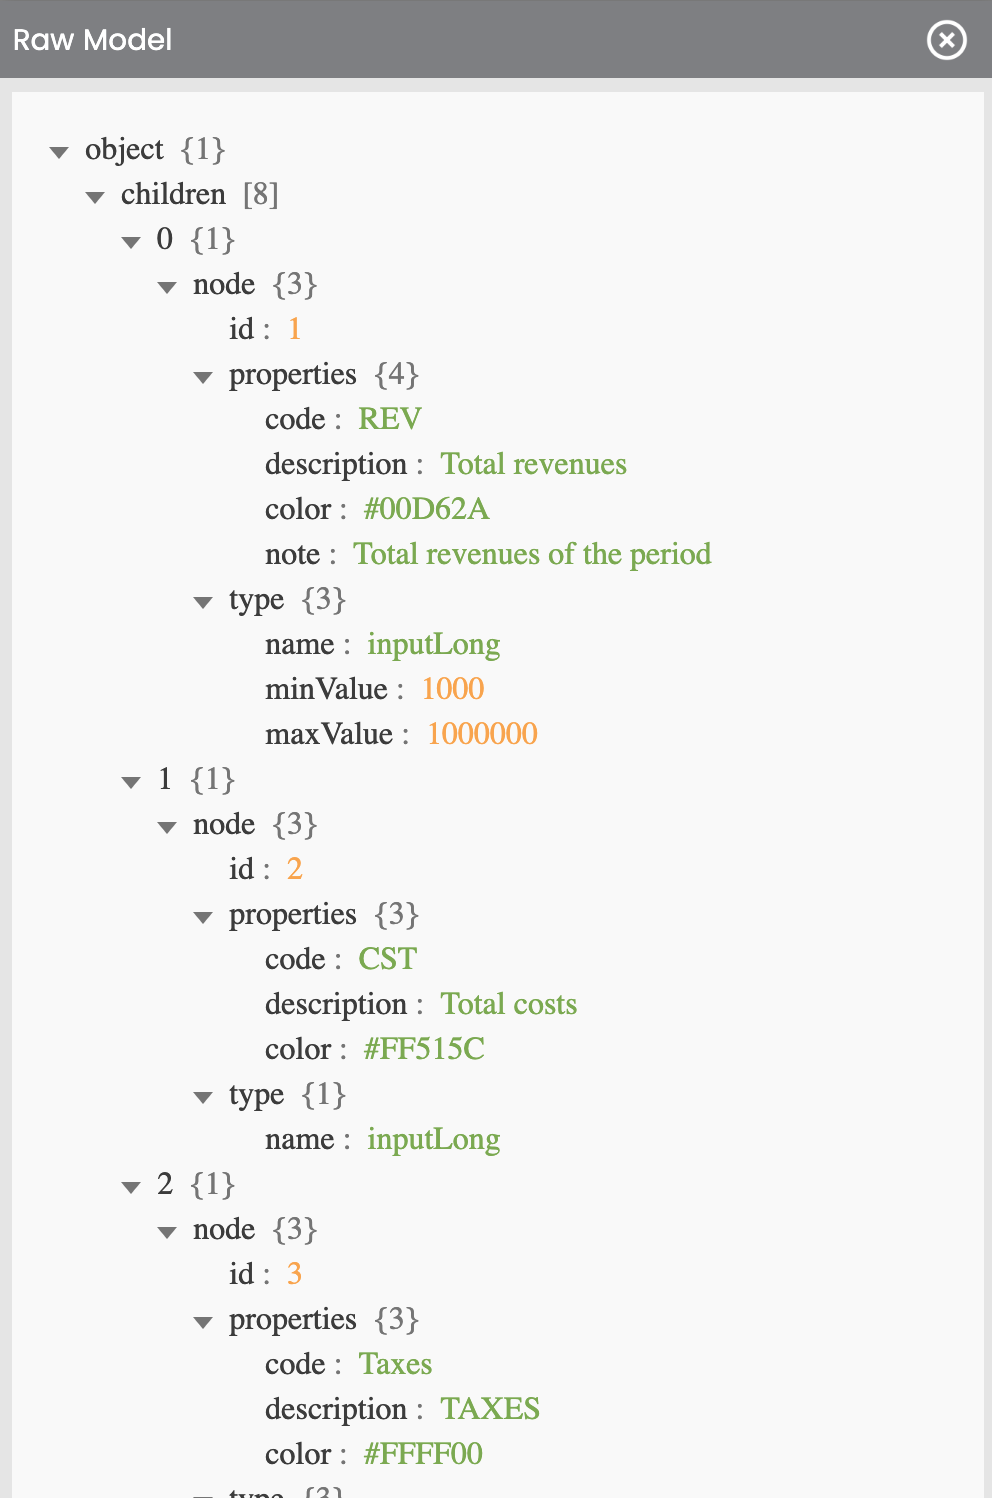
Figure - Dynamic Form Structure, Raw model |
Save tab:
This feature allows the authorized user to export the JSON in a text file. This can be useful for power users for testing/development purposes; for example, when the user want to share the information with some other stakeholder or external system, or also for comparing them with the JSON returned/managed by APIs. The exported file is named: “SheetModelID<xxx>.json”.
View Template:
Through this feature is possible to inspect the Template Structure Detail, used to create the form.
Close tab:
The user can use this feature to close the form and go back to the previous functionality.
User Permissions' type
The use of the described functions requires the possession of adequate permissions. Permissions are assigned to the user, based on a group to which they belong (type of user).
Here few permissions that can be attributed:
-
View Dynamic Form;
-
View and Edit Data Dynamic Form.
View Dynamic Form
Users with this level of qualification can consult all the information related to the dynamic form like headers, dynamic form model, the filled date. It is also possible to download the forms’ model or get dynamic form information from external system using Rest API.
View and Edit Dynamic Form
Users with this level of qualification can consult all the information related to the dynamic form like headers, dynamic form model, the filled date. It is also possible to download the forms’ model or get dynamic form information from external system using Rest API.
These users can also modify information related to dynamic forms: create new forms, insert values, modify the form’s status like its cancelling or closing, and perform any other operation that could change the previous created form. It is also possible to re-call PATCH and POST APIs on a dynamic form’s information.
For further information about this topic you can also see this topic https://overit-docs.atlassian.net/wiki/pages/createpage.action?spaceKey=GP&title=DCS%20-%20%20Permissions.